打造完备的iOS组件化方案:如何面向接口进行模块解耦

关于组件化的探讨已经有不少了,在之前的文章”iOS VIPER架构实践(三):面向接口的路由设计”中,综合比较了各种方案后,我倾向于使用面向接口的方式进行组件化。

这是一篇从代码层面讲解模块解耦的文章,会全方位地展示如何实践面向接口的思想,尽量全面地探讨在模块管理和解耦的过程中,需要考虑到的各种问题,并且给出实际的解决方案,以及对应的模块管理开源工具:ZIKRouter。你也可以根据本文的内容改造自己现有的方案,即使你的项目不进行组件化,也可以参考本文进行代码解耦。

文章主要内容:

  • 如何衡量模块解耦的程度
  • 对比不同方案的优劣
  • 在编译时进行静态路由检查,避免使用不存在的模块
  • 如何进行模块解耦,包括模块重用、模块适配、模块间通信、子模块交互
  • 模块的接口和依赖管理
  • 管理界面跳转逻辑

什么是组件化

将模块单独抽离、分层,并制定模块间通信的方式,从而实现解耦,以及适应团队开发。

为什么需要组件化

主要有4个原因:

  • 模块间解耦
  • 模块重用
  • 提高团队协作开发效率
  • 单元测试

当项目越来越大的时候,各个模块之间如果是直接互相引用,就会产生许多耦合,导致接口滥用,当某天需要进行修改时,就会牵一发而动全身,难以维护。

问题主要体现在:

  • 修改某个模块的功能时,需要修改许多其他模块的代码,因为这个模块被其他模块引用
  • 模块对外的接口不明确,外部甚至会调用不应暴露的私有接口,修改时会耗费大量时间
  • 修改的模块涉及范围较广,很容易影响其他团队成员的开发,产生代码冲突
  • 当需要抽离模块到其他地方重用时,会发现耦合导致根本无法单独抽离
  • 模块间的耦合导致接口和依赖混乱,难以编写单元测试

所以需要减少模块之间的耦合,用更规范的方式进行模块间交互。这就是组件化,也可以叫做模块化。

你的项目是否需要组件化

组件化也不是必须的,有些情况下并不需要组件化:

  • 项目较小,模块间交互简单,耦合少
  • 模块没有被多个外部模块引用,只是一个单独的小模块
  • 模块不需要重用,代码也很少被修改
  • 团队规模很小
  • 不需要编写单元测试

组件化也是有一定成本的,你需要花时间设计接口,分离代码,所以并不是所有的模块都需要组件化。

不过,当你发现这几个迹象时,就需要考虑组件化了:

  • 模块逻辑复杂,多个模块间频繁互相引用
  • 项目规模逐渐变大,修改代码变得越来越困难
  • 团队人数变多,提交的代码经常和其他成员冲突
  • 项目编译耗时较大
  • 模块的单元测试经常由于其他模块的修改而失败

组件化方案的8条指标

决定了要开始组件化之路后,就需要思考我们的目标了。一个组件化方案需要达到怎样的效果呢?我在这里给出8个理想情况下的指标:

  1. 模块间没有直接耦合,一个模块内部的修改不会影响到另一个模块
  2. 模块可以被单独编译
  3. 模块间能够清晰地进行数据传递
  4. 模块可以随时被另一个提供了相同功能的模块替换
  5. 模块的对外接口容易查找和维护
  6. 当模块的接口改变时,使用此模块的外部代码能够被高效地重构
  7. 尽量用最少的修改和代码,让现有的项目实现模块化
  8. 支持 Objective-C 和 Swift,以及混编

前4条用于衡量一个模块是否真正解耦,后4条用于衡量在项目实践中的易用程度。最后一条必须支持 Swift,是因为 Swift 是一个必然的趋势,如果你的方案不支持 Swift,说明这个方案在将来的某个时刻必定要改进改变,而到时候所有基于这个方案实现的模块都会受到影响。

基于这8个指标,我们就能在一定程度上对我们的方案做出衡量了。

方案对比

现在主要有3种组件化方案:URL 路由、target-action、protocol 匹配。

接下来我们就比较一下这几种组件化方案,看看它们各有什么优缺点。这部分在之前的文章中已经探讨过,这里再重新比较一次,补充一些细节。必须要先说明的是,没有一个完美的方案能满足所有场景下的需求,需要根据每个项目的需求选择最适合的方案。

URL 路由

目前 iOS 上绝大部分的路由工具都是基于 URL 匹配的,或者是根据命名约定,用 runtime 方法进行动态调用。

这些动态化的方案的优点是实现简单,缺点是需要维护字符串表,或者依赖于命名约定,无法在编译时暴露出所有问题,需要在运行时才能发现错误。

代码示例:

1
2
3
4
5
// 注册某个URL
[URLRouter registerURL:@"app://editor" handler:^(NSDictionary *userInfo) {
UIViewController *editorViewController = [[EditorViewController alloc] initWithParam:userInfo];
return editorViewController;
}];
1
2
3
4
// 调用路由
[URLRouter openURL:@"app://editor/?debug=true" completion:^(NSDictionary *info) {
}];

URL router 的优点:

  • 极高的动态性,适合经常开展运营活动的 app,例如电商
  • 方便地统一管理多平台的路由规则
  • 易于适配 URL Scheme

URL router 的缺点:

  • 传参方式有限,并且无法利用编译器进行参数类型检查,因此所有的参数都只能从字符串中转换而来
  • 只适用于界面模块,不适用于通用模块
  • 不能使用 designated initializer 声明必需参数
  • 要让 view controller 支持 url,需要为其新增初始化方法,因此需要对模块做出修改
  • 不支持 storyboard
  • 无法明确声明模块提供的接口,只能依赖于接口文档,重构时无法确保修改正确
  • 依赖于字符串硬编码,难以管理
  • 无法保证所使用的模块一定存在
  • 解耦能力有限,url 的”注册”、”实现”、”使用”必须用相同的字符规则,一旦任何一方做出修改都会导致其他方的代码失效,并且重构难度大

字符串解耦的问题

如果用上面的8个指标来衡量,URL 路由只能满足”支持模块单独编译”、”支持 OC 和 Swift”两条。它的解耦程度非常一般。

所有基于字符串的解耦方案其实都可以说是伪解耦,它们只是放弃了编译依赖,但是当代码变化之后,即便能够编译运行,逻辑仍然是错误的。

例如修改了模块定义时的 URL:

1
2
3
4
// 注册某个URL
[URLRouter registerURL:@"app://editorView" handler:^(NSDictionary *userInfo) {
...
}];

那么调用者的 URL 也必须修改,代码仍然是有耦合的,只不过此时编译器无法检查而已。这会导致维护更加困难,一旦 URL 中的参数有了增减,或者决定替换为另一个模块,参数命名有了变化,几乎没有高效的方式来重构代码。可以使用宏定义来管理字符串,不过这要求所有模块都使用同一个头文件,并且也无法解决参数类型和数量变化的问题。

URL 路由适合用来做远程模块的网络协议交互,而在管理本地模块时,最大的甚至是唯一的优势,就是适合经常跨多端运营活动的 app,因为可以由运营人员统一管理多平台的路由规则。

代表框架

改进:避免字符串管理

改进 URL 路由的方式,就是避免使用字符串,通过接口管理模块。

参数可以通过 protocol 直接传递,能够利用编译器检查参数类型,并且在 ZIKRouter 中,能通过路由声明和编译检查,保证所使用的模块一定存在。在为模块创建路由时,也无需修改模块的代码。

但是必须要承认的是,尽管 URL 路由缺点多多,但它在跨平台路由管理上的确是最适合的方案。因此 ZIKRouter 也对 URL 路由做出了支持,在用 protocol 管理的同时,可以通过字符串匹配 router,也能和其他 URL router 框架对接。

Target-Action 方案

有一些模块管理工具基于 Objective-C 的 runtime、category 特性动态获取模块。例如通过NSClassFromString获取类并创建实例,通过performSelector: NSInvocation动态调用方法。

例如基于 target-action 模式的设计,大致是利用 category 为路由工具添加新接口,在接口中通过字符串获取对应的类,再用 runtime 创建实例,动态调用实例的方法。

示例代码:

1
2
3
4
5
6
7
8
// 模块管理者,提供了动态调用 target-action 的基本功能
@interface Mediator : NSObject
+ (instancetype)sharedInstance;
- (id)performTarget:(NSString *)targetName action:(NSString *)actionName params:(NSDictionary *)params;
@end
1
2
3
4
5
6
7
8
9
10
11
12
13
14
15
16
17
// 在 category 中定义新接口
@interface Mediator (ModuleActions)
- (UIViewController *)Mediator_editorViewController;
@end
@implementation Mediator (ModuleActions)
- (UIViewController *)Mediator_editorViewController {
// 使用字符串硬编码,通过 runtime 动态创建 Target_Editor,并调用 Action_viewController:
UIViewController *viewController = [self performTarget:@"Editor" action:@"viewController" params:@{@"key":@"value"}];
return viewController;
}
@end
// 调用者通过 Mediator 的接口调用模块
UIViewController *editor = [[Mediator sharedInstance] Mediator_editorViewController];
1
2
3
4
5
6
7
8
9
10
11
12
13
14
15
// 模块提供者提供 target-action 的调用方式
@interface Target_Editor : NSObject
- (UIViewController *)Action_viewController:(NSDictionary *)params;
@end
@implementation Target_Editor
- (UIViewController *)Action_viewController:(NSDictionary *)params {
// 参数通过字典传递,无法保证类型安全
EditorViewController *viewController = [[EditorViewController alloc] init];
viewController.valueLabel.text = params[@"key"];
return viewController;
}
@end

优点:

  • 利用 category 可以明确声明接口,进行编译检查
  • 实现方式轻量

缺点:

  • 需要在 mediator 和 target 中重新添加每一个接口,模块化时代码较为繁琐
  • 在 category 中仍然引入了字符串硬编码,内部使用字典传参,一定程度上也存在和 URL 路由相同的问题
  • 无法保证所使用的模块一定存在,target 模块在修改后,使用者只有在运行时才能发现错误
  • 过于依赖 runtime 特性,无法应用到纯 Swift 上。在 Swift 中扩展 mediator 时,无法使用纯 Swift 类型的参数
  • 可能会创建过多的 target 类
  • 使用 runtime 相关的接口调用任意类的任意方法,需要注意别被苹果的审核误伤。参考:Are performSelector and respondsToSelector banned by App Store?

字典传参的问题

字典传参时无法保证参数的数量和类型,只能依赖调用约定,就和字符串传参一样,一旦某一方做出修改,另一方也必须修改。

相比于 URL 路由,target-action 通过 category 的接口把字符串管理的问题缩小到了 mediator 内部,不过并没有完全消除,而且在其他方面仍然有很多改进空间。上面的8个指标中其实只能满足第2个”支持模块单独编译”,另外在和接口相关的第3、5、6点上,比 URL 路由要有改善。

代表框架

CTMediator

改进:避免字典传参

Target-Action 方案最大的优点就是整个方案实现轻量,并且也一定程度上明确了模块的接口。只是这些接口都需要通过 Target-Action 封装一次,并且每个模块都要创建一个 target 类,既然如此,直接用 protocol 进行接口管理会更加简单。

ZIKRouter 避免使用 runtime 获取和调用模块,因此可以适配 OC 和 swift。同时,基于 protocol 匹配的方式,避免引入字符串硬编码,能够更好地管理模块,也避免了字典传参。

基于 protocol 匹配的方案

有一些模块管理工具或者依赖注入工具,也实现了基于接口的管理方式。实现思路是将 protocol 和对应的类进行字典匹配,之后就可以用 protocol 获取 class,再动态创建实例。

BeeHive 示例代码:

1
2
// 注册模块 (protocol-class 匹配)
[[BeeHive shareInstance] registerService:@protocol(EditorViewProtocol) service:[EditorViewController class]];
1
2
// 获取模块 (用 runtime 创建 EditorViewController 实例)
id<EditorViewProtocol> editor = [[BeeHive shareInstance] createService:@protocol(EditorViewProtocol)];

优点:

  • 利用接口调用,实现了参数传递时的类型安全
  • 直接使用模块的 protocol 接口,无需再重复封装

缺点:

  • 由框架来创建所有对象,创建方式有限,例如不支持外部传入参数,再调用自定义初始化方法
  • 用 OC runtime 创建对象,不支持 Swift
  • 只做了 protocol 和 class 的匹配,不支持更复杂的创建方式和依赖注入
  • 无法保证所使用的 protocol 一定存在对应的模块,也无法直接判断某个 protocol 是否能用于获取模块

相比直接 protocol-class 匹配的方式,protocol-block 的方式更加易用。例如 Swinject。

Swinject 示例代码:

1
2
3
4
5
6
7
8
let container = Container()
// 注册模块
container.register(EditorViewProtocol.self) { _ in
return EditorViewController()
}
// 获取模块
let editor = container.resolve(EditorViewProtocol.self)!

代表框架

BeeHive

Swinject

改进:离散式管理

BeeHive 这种方式和 ZIKRouter 的思路类似,但是所有的模块在注册后,都是由 BeeHive 单例来创建,使用场景十分有限,例如不支持纯 Swift 类型,不支持使用自定义初始化方法以及额外的依赖注入。

ZIKRouter 进行了进一步的改进,并不是直接对 protocol 和 class 进行匹配,而是将 protocol 和 router 子类或者 router 对象进行匹配,在 router 子类中再提供创建模块的实例的方式。这时,模块的创建职责就从 BeeHive 单例上转到了每个单独的 router 上,从集约型变成了离散型,扩展性进一步提升。

Protocol-Router 匹配方案

变成 protocol-router 匹配后,代码将会变成这样:

一个 router 父类提供基础的方法:

1
2
3
4
5
6
7
8
9
10
11
12
13
class ZIKViewRouter: NSObject {
...
// 获取模块
public class func makeDestination -> Any? {
let router = self.init(with: ViewRouteConfig())
return router.destination(with: router.configuration)
}
// 让子类重写
public func destination(with configuration: ViewRouteConfig) -> Any? {
return nil
}
}
Objective-C Sample

1
2
3
4
5
6
7
8
9
10
11
12
13
14
15
16
17
@interface ZIKViewRouter: NSObject
@end
@implementation ZIKViewRouter
...
// 获取模块
+ (id)makeDestination {
ZIKViewRouter *router = [self alloc] initWithConfiguration:[ZIKViewRouteConfiguration new]];
return [router destinationWithConfiguration:router.configuration];
}
// 让子类重写
- (id)destinationWithConfiguration:(ZIKViewRouteConfiguration *)configuration {
return nil;
}
@end


每个模块各自编写自己的 router 子类:

1
2
3
4
5
6
7
8
// editor 模块的 router
class EditorViewRouter: ZIKViewRouter {
// 子类重写,创建模块
override func destination(with configuration: ViewRouteConfig) -> Any? {
let destination = EditorViewController()
return destination
}
}
Objective-C Sample

1
2
3
4
5
6
7
8
9
10
11
12
13
// editor 模块的 router
@interface EditorViewRouter : ZIKViewRouter
@end
@implementation EditorViewRouter
// 子类重写,创建模块
- (EditorViewController *)destinationWithConfiguration:(ZIKViewRouteConfiguration *)configuration {
EditorViewController *destination = [[EditorViewController alloc] init];
return destination;
}
@end


把 protocol 和 router 类进行注册绑定:

1
EditorViewRouter.register(RoutableView<EditorViewProtocol>())
Objective-C Sample

1
2
// 注册 protocol 和 router
[EditorViewRouter registerViewProtocol:@protocol(EditorViewProtocol)];


然后就可以用 protocol 获取 router 类,再进一步获取模块:

1
2
3
4
// 获取模块的 router 类
let routerClass = Router.to(RoutableView<EditorViewProtocol>())
// 获取 EditorViewProtocol 模块
let destination = routerClass?.makeDestination()
Objective-C Sample

1
2
3
4
// 获取模块的 router 类
Class routerClass = ZIKViewRouter.toView(@protocol(EditorViewProtocol));
// 获取 EditorViewProtocol 模块
id<EditorViewProtocol> destination = [routerClass makeDestination];


加了一层 router 中间层之后,解耦能力一下子就增强了:

  • 可以在 router 上添加许多通用的扩展接口,例如创建模块、依赖注入、界面跳转、界面移除,甚至增加 URL 路由支持
  • 在每个 router 子类中可以进行更详细的依赖注入和自定义操作
  • 可以自定义创建对象的方式,例如自定义初始化方法、工厂方法,在重构时可以直接搬运现有的创建代码,无需在原来的类上增加或修改接口,减少模块化过程中的工作量
  • 可以让多个 protocol 和同一个模块进行匹配
  • 可以让模块进行接口适配,允许外部做完适配后,为 router 添加新的 protocol,解决编译依赖的问题
  • 返回的对象只需符合 protocol,不再和某个单一的类绑定。因此可以根据条件,返回不同的对象,例如适配不同系统版本时,返回不同的控件,让外部只关注接口

动态化的风险

大部分组件化方案都会带来一个问题,就是减弱甚至抛弃编译检查,因为模块已经变得高度动态化了。

当调用一个模块时,怎么能保证这个模块一定存在?直接引用类时,如果类不存在,编译器会给出引用错误,但是动态组件就无法在静态时检查了。

例如 URL 地址变化了,但是代码中的某些 URL 没有及时更新;使用 protocol 获取模块时,protocol 并没有注册对应的模块。这些问题都只能在运行时才能发现。

那么有没有一种方式,可以让模块既高度解耦,又能在编译时保证调用的模块一定存在呢?

答案是 YES。

静态路由检查

ZIKRouter 最特别的功能,就是能够保证所使用的 protocol 一定存在,在编译阶段就能防止使用不存在的模块。这个功能可以让你更安全、更简单地管理所使用的路由接口,不必再用其他复杂的方式进行检查和维护。

当使用了错误的 protocol 时,会产生编译错误。

Swift 中使用未声明的 protocol:

Swift路由检查

Objective-C 中使用未声明的 protocol:

OC路由检查

这个特性通过两个机制来实现:

  • 只有被声明为可路由的 protocol 才能用于路由,否则会产生编译错误
  • 可路由的 protocol 必定有一个对应的模块存在

下面就一步步讲解,怎么在保持动态解耦特性的同时,实现一套完备的静态类型检查的机制。

路由声明

怎么才能声明一个 protocol 是可以用于路由的呢?

要实现第一个机制,关键就是要为 protocol 添加特殊的属性或者类型,使用时,如果 protocol 不符合特定类型,就产生编译错误。

原生 Xcode 并不支持这样的静态检查,这时候就要考验我们的创造力了。

Objective-C:protocol 继承链

在 Objective-C 中,可以要求 protocol 必须继承自某个特定的父 protocol,并且通过宏定义 + protocol 限定,对 protocol 的父 protocol 继承链进行静态检查。

例如 ZIKRouter 中获取 router 类的方法是这样的:

1
2
3
4
5
6
@protocol ZIKViewRoutable
@end
@interface ZIKViewRouter()
@property (nonatomic, class, readonly) ZIKViewRouterType *(^toView)(Protocol<ZIKViewRoutable> *viewProtocol);
@end

toView用类属性的方式提供,以方便链式调用,这个 block 接收一个Protocol<ZIKViewRoutable> *类型的 protocol,返回对应的 router 类。

Protocol<ZIKViewRoutable> *表示这个 protocol 必须继承自ZIKViewRoutable。普通 protocol 的类型是Protocol *,所以如果传入@protocol(EditorViewProtocol)就会产生编译警告。

而如果用宏定义再给 protocol 变量加上一个 protocol 限定,进行一次类型转换,就可以利用编译器检查 protocol 的继承链:

1
2
3
// 声明时继承自 ZIKViewRoutable
@protocol EditorViewProtocol <ZIKViewRoutable>
@end
1
2
// 宏定义,为 protocol 变量添加 protocol 限定
#define ZIKRoutable(RoutableProtocol) (Protocol<RoutableProtocol>*)@protocol(RoutableProtocol)
1
2
// 用 protocol 获取 router
ZIKViewRouter.toView(ZIKRoutable(EditorViewProtocol))

ZIKRoutable(EditorViewProtocol)展开后是(Protocol<EditorViewProtocol> *)@protocol(EditorViewProtocol),类型为Protocol<EditorViewProtocol> *。在 Objective-C 中Protocol<EditorViewProtocol> *Protocol<ZIKViewRoutable> *的子类型,编译器将不会有警告。

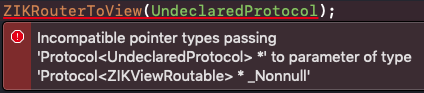
但是当传入的 protocol 没有继承自ZIKViewRoutable时,例如ZIKRoutable(UndeclaredProtocol)的类型是Protocol<UndeclaredProtocol> *,编译器在检查 protocol 的继承链时,由于UndeclaredProtocol没有继承自ZIKViewRoutable,因此Protocol<UndeclaredProtocol> *不是Protocol<ZIKViewRoutable> *的子类型,编译器会给出类型错误的警告。在Build Settings中可以把incompatible pointer types警告变成编译错误。

最后,把ZIKViewRouter.toView(ZIKRoutable(EditorViewProtocol))用宏定义简化一下,变成ZIKViewRouterToView(EditorViewProtocol),就能在获取 router 的时候方便地静态检查 protocol 的类型了。

Swift:条件扩展

Swift 中不支持宏定义,也不能随意进行类型转换,因此需要换一种方式来进行编译检查。

可以用 struct 的泛型传递 protocol,然后用条件扩展为特定泛型的 struct 添加初始化方法,从而让没有声明过的泛型类型不能直接创建 struct。

例如:

1
2
3
4
5
6
// 用 RoutableView 的泛型来传递 protocol
struct RoutableView<Protocol> {
// 禁止默认的初始化方法
@available(*, unavailable, message: "Protocol is not declared as routable")
public init() { }
}
1
2
3
4
5
// 泛型为 EditorViewProtocol 的扩展
extension RoutableView where Protocol == EditorViewProtocol {
// 允许初始化
init() { }
}
1
2
3
4
5
// 泛型为 EditorViewProtocol 时可以初始化
RoutableView<EditorViewProtocol>()
// 没有声明过的泛型无法初始化,会产生编译错误
RoutableView<UndeclaredProtocol>()

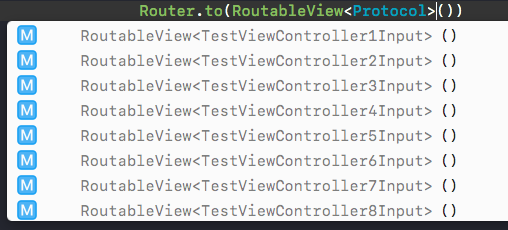
此时 Xcode 还可以给出自动补全,列出所有声明过的 protocol:

自动补全

路由检查

通过路由声明,我们做到了在编译时对所使用的 protocol 做出限制。下一步就是保证声明过的 protocol 必定有对应的模块,类似于程序在 link 阶段,会检查头文件中声明过的类必定有对应的实现。

这一步是无法直接在编译阶段实现的,不过可以参考 iOS 在启动时检查动态库的方式,我们可以在启动阶段实现这个功能。

Objective-C: protocol 遍历

在 app 以 DEBUG 模式启动时,我们可以遍历所有继承自 ZIKViewRoutable 的 protocol,在注册表中检查是否有对应的 router,如果没有,就给出断言错误。

另外,还可以让 router 同时注册创建模块时用到类:

1
EditorViewRouter.registerView(EditorViewController.self)
Objective-C Sample

1
2
// 注册 protocol 和 router
[EditorViewRouter registerView:[EditorViewController class]];


从而进一步检查 router 中的 class 是否遵守对应的 protocol。这时整个类型检查过程就完整了。

Swift: 符号遍历

但是 Swift 中的 protocol 是静态类型,并不能通过 OC runtime 直接遍历。是不是就无法动态检查了呢?其实只要发挥创造力,一样能做到。

Swift 的泛型名会在符号名中体现出来。例如上面声明的 init 方法:

1
2
3
4
5
// MyApp 中,泛型为 EditorViewProtocol 的扩展
extension RoutableView where Protocol == EditorViewProtocol {
// 允许初始化
init() { }
}

在还原符号后就是(extension in MyApp):ZRouter.RoutableView<A where A == MyApp.EditorViewProtocol>.init() -> ZRouter.RoutableView<MyApp.EditorViewProtocol>

此时我们可以遍历 app 的符号表,来查找 RoutableView 的所有扩展,从而提取出所有声明过的 protocol 类型,再去检查是否有对应的 router。

Swift Runtime 和 ABI

但是如果要进一步检查 router 中的 class 是否遵守 router 中的 protocol,就会遇到问题了。在 Swift 中怎么检查某个任意的 class 遵守某个 Swift protocol ?

Swift 中没有直接提供class_conformsToProtocol这样的函数,不过我们可以通过 Swift Runtime 提供的标准函数和 Swift ABI 中定义的内存结构,完成同样的功能。

这部分的实现可以参考代码:_swift_typeIsTargetType。之后我会写几篇文章详细讲解 Swift ABI 的底层内容。

路由检查这部分只在 DEBUG 模式下进行,因此可以放开折腾。

自动推断返回值类型

还有最后一个问题,在 BeeHive 中使用[[BeeHive shareInstance] createService:@protocol(EditorViewProtocol)]获取模块时,返回值是一个id类型,使用者需要手动指定返回变量的类型,在 Swift 中更是需要手动类型转换,而这一步是可能出错的,并且编译器无法检查。要实现最完备的类型检查,就不能忽视这个问题。

有没有一种方式能让返回值的类型和 protocol 的类型对应呢?OC 中的泛型在这时候就发挥作用了。

可以在 router 上声明模块的泛型:

1
2
@interface ZIKViewRouter<__covariant Destination, __covariant RouteConfig: ZIKViewRouteConfiguration *> : NSObject
@end

这里使用了两个泛型参数 DestinationRouteConfig,分别表示此 router 所管理的模块类型和路由 config 的类型。__covariant则表示这个泛型支持协变,也就是子类型可以和父类型一样使用。

声明了泛型参数后,我们可以在方法中的参数声明中使用泛型:

1
2
3
4
5
6
7
@interface ZIKViewRouter<__covariant Destination, __covariant RouteConfig: ZIKViewRouteConfiguration *> : NSObject
- (nullable Destination)makeDestination;
- (nullable Destination)destinationWithConfiguration:(RouteConfig)configuration;
@end

此时在获取 router 时,就可以把 protocol 的类型作为 router 的泛型参数:

1
#define ZIKRouterToView(ViewProtocol) [ZIKViewRouter<id<ViewProtocol>,ZIKViewRouteConfiguration *> toView](ZIKRoutable(ViewProtocol))

使用ZIKRouterToView(EditorViewProtocol)获取的 router 类型就是ZIKViewRouter<id<EditorViewProtocol>,ZIKViewRouteConfiguration *>。在这个 router 上调用makeDestination时,返回值的类型就是id<EditorViewProtocol>,从而实现了完整的类型传递。

而在 Swift 中,直接用函数泛型就能实现:

1
2
3
4
5
class Router {
static func to<Protocol>(_ routableView: RoutableView<Protocol>) -> ViewRouter<Protocol, ViewRouteConfig>?
}

使用Router.to(RoutableView<EditorViewProtocol>())时,获得的 router 类型就是ViewRouter<EditorViewProtocol, ViewRouteConfig>?,在调用makeDestination时,返回值类型就是EditorViewProtocol,无需手动类型转换。

如果你使用协议组合,还能同时指明多个类型:

1
typealias EditorViewProtocol = UIViewController & EditorViewInput

并且在 router 子类中重写对应方法时,也能用泛型进一步确保类型正确:

1
2
3
4
5
6
7
8
class EditorViewRouter: ZIKViewRouter<EditorViewProtocol, ZIKViewRouteConfiguration> {
override func destination(with configuration: ZIKViewRouteConfiguration) -> EditorViewProtocol? {
// 函数重写时,参数类型会和泛型一致,实现时能确保返回值的类型是正确的
return EditorViewController()
}
}

现在我们完成了一套完备的类型检查机制,而且这套检查同时支持 OC 和 Swift。

至此,一个基于接口的、类型安全的模块管理工具就完成了。使用 makeDestination 创建模块只是最基本的功能,我们可以在父类 router 中进行许多有用的功能扩展,例如依赖注入、界面跳转、接口适配,来更好地进行面向接口的开发。

模块解耦

那么在面向接口编程时,我们还需要哪些功能呢?在扩展之前,我们先来讨论一下如何使用接口进行模块解耦,首先从理论层面梳理,再把理论转化为工具。

模块分类

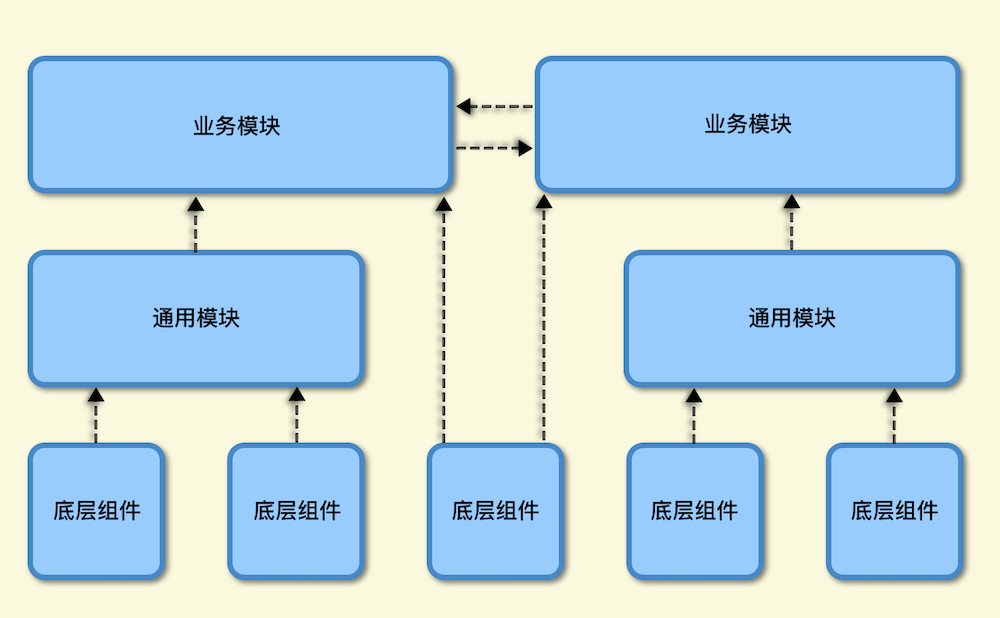
不同模块对解耦的要求是不同的。模块从层级上可以从低到高分类:

  • 底层功能模块,功能单一,有一定通用性,例如各种功能组件(日志、数据库)。底层模块的主要目的是复用
  • 中间层的通用业务模块,可以在不同项目中通用。会引用各种底层模块,以及和其他业务模块通信
  • 中间层的特殊功能模块,提供了独特的功能,没有通用性,可能会引用一些底层模块,例如性能监控模块。这种模块可以被其他模块直接引用,不用太多考虑模块间解耦的问题
  • 上层的专有业务模块,属于某个项目中独有的业务。会引用各种底层模块,以及和其他业务模块通信,和中间层的差别就是上层的解耦要求没有中间层那么高

什么是解耦

首先明确一下什么才是解耦,梳理这个问题能够帮助我们明确目标。

解耦的目的基本上就是两个:提高代码的可维护性、模块重用。指导思想就是面向对象的设计原则。

解耦也有不同的程度,从低到高,差不多可以分为3层:

  1. 模块间使用抽象接口交互,没有直接类型耦合,一个模块内部的修改不会影响到另一个模块 (单一职责、依赖倒置)
  2. 模块可重用,可以被单独编译 (接口隔离、依赖倒置、控制反转)
  3. 模块可以随时被另一个提供了相同功能的模块替换 (开闭原则、依赖倒置、控制反转)

第一层:抽象接口,提取依赖关系

第一层解耦,是为了减少不同代码间的依赖关系,让代码更容易维护。例如把类替换为 protocol,隔绝模块的私有接口,把依赖关系最小化。

解耦的整个过程,就是梳理和管理依赖的过程。因此模块的内聚性越高越好,外部依赖越少越好,这样维护起来才更简单。

如果模块不需要重用,那在这一层基本上就够了。

第二层:模块重用,管理模块间通信

第二层解耦,是把代码单独抽离,做到了模块重用,可以交给不同的成员维护,对模块间通信提出了更高的要求。模块需要在接口中声明外部依赖,去除对特定类型的耦合。

此时影响最大的地方就是模块间通信的方式,有时候即便是能够单独编译了,也不意味着解耦。例如 URL 路由,只是放弃了编译检查,耦合关系还是存在于 URL 字符串中,一方的 URL 改变,其他方的代码逻辑就会出错,所以逻辑上仍然是耦合的。因此所有基于某种隐式调用约定的方案(例如字符串匹配),都只是解除编译检查,而不是真正的解耦。

有人说使用 protocol 进行模块间通信,会导致模块和 protocol 耦合。这个观点是错误的。 protocol 恰恰是把模块的依赖明确地提取出来,是一种更高效的方法。否则完全用隐式约定来进行通信,没有编译器的辅助,一旦模块的接口名、参数类型、参数数量需要更新,将会非常难以维护。

而且,通过设计模式,是可以解除对特定 protocol 的依赖的,下文将会对此进行讲解。

第三层:去除隐式约定

第三层解耦,模块间做到了真正的解耦,只要两个模块提供了相同的功能,就可以无缝替换,并且调用方无需任何修改。被替换的模块只需要提供相同功能的接口,通过适配器对接即可,没有其他任何限制,不存在任何其他的隐式调用约定。

一般有这种解耦要求的,都是那些跨项目的通用模块,而项目内专有的业务模块则没有这么高的要求。不过那些跨多端的模块和远程模块无法做到这样的解耦,因为跨多端时没有统一的定义接口的方式,因此只能通过隐式约定或者网络协议定义接口,例如 URL 路由。

总的来说,解耦的过程就是职责分离、依赖管理(依赖声明和注入)、模块通信 这三大部分。

模块重用

要做到模块重用,模块需要尽量减少外部依赖,并且把依赖提取出来,体现到模块的接口上,让调用者主动注入。同时,把模块的各种事件也提取出来,让调用者进行处理。

这样一来,模块就只需要负责自身的逻辑,不需要关心调用者如何使用模块。那些每个应用各自专有的应用层逻辑也就从模块中分离出来了。

因此,要想做好模块解耦,管理好依赖是非常重要的。而 protocol 接口就是管理依赖的最高效的方式。

依赖管理

依赖,就是模块中用到的外部数据和外部模块。接下来讨论如何使用 protocol 管理依赖,并且演示如何用 router 实现。

依赖注入

先来复习一下依赖注入的概念。依赖注入和依赖查找是实现控制反转思想的具体方式。

控制反转是将对象依赖的获取从主动变为被动,从对象内部直接引用并获取依赖,变为由外部向对象提供对象所要求的依赖,把不属于自己的职责移交出去,从而让对象和其依赖解耦。此时控制流的主动权从内部转移到了外部,因此称为控制反转。

依赖注入就是指外部向对象传入依赖。

一个类 A 在接口中体现出内部需要用到的一些依赖(例如内部需要用到类B的实例),从而让使用者从外部注入这些依赖,而不是在类内部直接引用依赖并创建类 B。依赖可以用 protocol 的方式声明,这样就可以使类 A 和所使用的依赖类 B 进行解耦。

分离模块创建和配置

那么如何用 router 进行依赖注入呢?

模块创建了实例后,经常还需要进行一些配置。模块管理工具应该从设计上提供配置功能。

最简单的方式,就是在destinationWithConfiguration:中创建 destination 时进行配置。但是我们还可以更进一步,把 destination 的创建和配置分离开。分离之后,router 就可以单独提供配置功能,去配置那些不是由 router 创建的 destination,例如 storyboard 中创建的 view、各种接口回调中返回的实例对象。这样就可以覆盖更多现存的使用场景,减少代码修改。

Prepare Destination

可以在 router 子类中的prepareDestination:configuration:中进行模块配置,也就是依赖注入,而模块的调用者无需关心这部分依赖是如何配置的:

1
2
3
4
5
6
7
8
9
10
11
12
13
14
15
16
17
18
19
20
21
22
23
24
25
26
27
28
29
30
31
32
33
34
35
36
37
38
39
// router 父类
class ZIKViewRouter<Destination, RouteConfig>: NSObject {
...
public class func makeDestination -> Destination? {
let router = self.init(with: ViewRouteConfig())
let destination = router.destination(with: router.configuration)
if let destination = destination {
// router 父类中调用模块配置方法
router.prepareDestination(destination, configuration: router.configuration)
}
return destination
}
// 模块创建,让子类重写
public func destination(with configuration: ViewRouteConfig) -> Destination? {
return nil
}
// 模块配置,让子类重写
func prepareDestination(_ destination: Destination, configuration: RouteConfig) {
}
}
// editor 模块的 router
class EditorViewRouter: ZIKViewRouter<EditorViewController, ViewRouteConfig> {
override func destination(with configuration: ViewRouteConfig) -> EditorViewController? {
let destination = EditorViewController()
return destination
}
// 配置模块,注入静态依赖
override func prepareDestination(_ destination: EditorViewController, configuration: ViewRouteConfig) {
// 注入 service 依赖
destination.storageService = Router.makeDestination(to: RoutableService<EditorStorageServiceInput>())
// 其他配置
destination.title = "默认标题"
}
}
Objective-C Sample

1
2
3
4
5
6
7
8
9
10
11
12
13
14
15
16
17
18
19
20
21
22
23
24
25
26
27
28
29
30
31
32
33
34
35
36
37
38
39
40
41
42
43
44
45
46
// router 父类
@interface ZIKViewRouter<__covariant Destination, __covariant RouteConfig: ZIKViewRouteConfiguration *>: NSObject
@end
@implementation ZIKViewRouter
...
+ (id)makeDestination {
ZIKViewRouter *router = [self alloc] initWithConfiguration:[ZIKViewRouteConfiguration new]];
id destination = [router destinationWithConfiguration:router.configuration];
if (destination) {
// router 父类中调用模块配置方法
[router prepareDestination:destination configuration:router.configuration];
}
return destination;
}
// 模块创建,让子类重写
- (id)destinationWithConfiguration:(ZIKViewRouteConfiguration *)configuration {
return nil;
}
// 模块配置,让子类重写
- (void)prepareDestination:(id)destination configuration:(ZIKViewRouteConfiguration *)configuration {
}
@end
// editor 模块的 router
@interface EditorViewRouter : ZIKViewRouter
@end
@implementation EditorViewRouter
- (EditorViewController *)destinationWithConfiguration:(ZIKViewRouteConfiguration *)configuration {
EditorViewController *destination = [[EditorViewController alloc] init];
return destination;
}
// 配置模块,注入静态依赖
- (void)prepareDestination:(EditorViewController *)destination configuration:(ZIKViewRouteConfiguration *)configuration {
// 注入 service 依赖
destination.storageService = [ZIKRouterToService(EditorStorageServiceInput) makeDestination];
// 其他配置
destination.title = @"默认标题";
}
@end


此时调用者中如果有某些对象不是创建自 router的,就可以直接用对应的 router 进行配置,执行依赖注入:

1
2
3
4
var destination: EditorViewProtocol = ...
Router.to(RoutableView<EditorViewProtocol>())?.prepare(destination: destination, configuring: { (config, _) in
})
Objective-C Sample

1
2
3
4
id<EditorViewProtocol> destination = ...
[ZIKRouterToView(EditorViewProtocol) prepareDestination:destination configuring:^(ZIKViewRouteConfiguration *config) {
}];


独立的配置功能在某些场景下是非常有用的,尤其是在重构现有代码的时候。有一些系统接口的设计就是在接口中返回对象,但是这些对象是由系统自动创建的,而不是通过 router 创建的,因此需要通过 router 对其进行配置,例如 storyboard 中创建的 view controller。此时将 view controller 模块化后,依然可以保持现有代码,只需要调用一句prepareDestination:configuration:配置即可,模块化的过程中就能让代码的修改最小化。

可选依赖:属性注入和方法注入

当依赖是可选的,并不是创建对象所必需的,可以用属性注入和方法注入。

属性注入是指外部设置对象的属性。方法注入是指外部调用对象的方法,从而传入依赖。

1
2
3
4
5
6
7
8
9
10
11
12
13
14
15
protocol PersonType {
var wife: Person? { get set } // 可选的属性依赖
func addChild(_ child: Person) -> Void // 可选的方法注入
}
protocol Child {
var parent: Person { get }
}
class Person: PersonType {
var wife: Person? = nil
var childs: Set<Child> = []
func addChild(_ child: Child) {
childs.insert(child)
}
}
Objective-C示例

1
2
3
4
5
6
7
8
9
10
11
12
@protocol PersonType: ZIKServiceRoutable
@property (nonatomic, strong, nullable) Person *wife; // 可选的属性依赖
- (void)addChild:(Person *)child; // 可选的方法注入
@end
@protocol Child
@property (nonatomic, strong) Person *parent;
@end
@interface Person: NSObject <PersonType>
@property (nonatomic, strong, nullable) Person *wife;
@property (nonatomic, strong) NSSet<id<Child>> childs;
@end


在 router 里,可以注入一些默认的依赖:

1
2
3
4
5
6
7
8
9
10
11
12
13
14
15
16
17
class PersonRouter: ZIKServiceRouter<Person, PerformRouteConfig> {
...
override func destination(with configuration: PerformRouteConfig) -> Person? {
let person = Person()
return person
}
// 配置模块,注入静态依赖
override func prepareDestination(_ destination: Person, configuration: PerformRouteConfig) {
if destination.wife != nil {
return
}
//设置默认值
let wife: Person = ...
person.wife = wife
}
}
Objective-C示例

1
2
3
4
5
6
7
8
9
10
11
12
13
14
15
16
17
18
@interface PersonRouter: ZIKServiceRouter<Person *, ZIKPerformRouteConfiguration *>
@end
@implementation PersonRouter
- (nullable Person *)destinationWithConfiguration:(ZIKPerformRouteConfiguration *)configuration {
Person *person = [Person new];
return person;
}
// 配置模块,注入静态依赖
- (void)prepareDestination:(Person *)destination configuration:(ZIKPerformRouteConfiguration *)configuration {
if (destination.wife != nil) {
return;
}
Person *wife = ...
destination.wife = wife;
}
@end


模块间参数传递

在执行路由操作的同时,调用者也可以用PersonType动态地注入依赖,也就是向模块传参。

configuration 就是用来进行各种功能扩展的。Router 可以在 configuration 上提供prepareDestination,让调用者设置,就能让调用者配置 destination。

1
2
3
4
5
6
7
8
9
let wife: Person = ...
let child: Child = ...
let person = Router.makeDestination(to: RoutableService<PersonType>(), configuring: { (config, _) in
// 获取模块的同时进行配置
config.prepareDestination = { destination in
destination.wife = wife
destination.addChild(child)
}
})
Objective-C示例

1
2
3
4
5
6
7
8
9
10
Person *wife = ...
Child *child = ...
Person *person = [ZIKRouterToService(PersonType)
makeDestinationWithConfiguring:^(ZIKPerformRouteConfiguration *config) {
// 获取模块的同时进行配置
config.prepareDestination = ^(id<PersonType> destination) {
destination.wife = wife;
[destination addChild:child];
};
}];


封装一下就能变成更简单的接口:

1
2
3
4
5
6
let wife: Person = ...
let child: Child = ...
let person = Router.makeDestination(to: RoutableService<PersonType>(), preparation: { destination in
destination.wife = wife
destination.addChild(child)
})
Objective-C示例

1
2
3
4
5
6
7
Person *wife = ...
Child *child = ...
Person *person = [ZIKRouterToService(PersonType)
makeDestinationWithPreparation:^(id<PersonType> destination) {
destination.wife = wife;
[destination addChild:child];
}];


必需依赖:工厂方法

有一些参数是在 destination 类创建前就需要传入的必需参数,例如初始化方法中的参数,就是必需依赖。

1
2
3
4
5
6
7
class Person: PersonType {
let name: String
// 初始化方法,需要必需参数
init(name: String) {
self.name = name
}
}
Objective-C示例

1
2
3
4
5
@interface Person: NSObject <PersonType>
@property (nonatomic, strong) NSString *name;
// 初始化方法,需要必需参数
- (instancetype)initWithName:(NSString *)name NS_DESIGNATED_INITIALIZER;
@end


这些必需参数有时候是由调用者提供的。在 URL 路由中,这种”必需”特性就无法体现出来,而用接口的方式就能简单地实现。

传递必需依赖需要用工厂模式,在工厂方法上声明必需参数和模块接口。

1
2
3
4
protocol PersonTypeFactory {
// 工厂方法,声明了必需参数 name,返回 PersonType 类型的 destination
func makeDestinationWith(_ name: String) -> PersonType?
}
Objective-C示例

1
2
3
4
@protocol PersonTypeFactory: ZIKServiceModuleRoutable
// 工厂方法,声明了必需参数 name,返回 PersonType 类型的 destination
- (id<PersonType>)makeDestinationWith:(NSString *)name;
@end


那么如何用 router 传递必需参数呢?

Router 的 configuration 可以用来进行自定义参数扩展。可以把必需参数保存到 configuration 上,或者更直接点,由 configuration 来提供工厂方法,然后使用工厂方法的 protocol 来获取模块:

1
2
3
4
5
6
7
8
9
10
// 通用 configuration,可以提供自定义工厂方法
class PersonModuleConfiguration: PerformRouteConfig, PersonTypeFactory {
// 工厂方法
public func makeDestinationWith(_ name: String) -> PersonType? {
self.makedDestination = Person(name: name)
return self.makedDestination
}
// 由工厂方法创建的 destination,提供给 router
public var makedDestination: Destination?
}
Objective-C示例

1
2
3
4
5
6
7
8
9
10
11
12
13
// 通用 configuration,可以提供自定义工厂方法
@interface PersonModuleConfiguration: ZIKPerformRouteConfiguration<PersonTypeFactory>
// 由工厂方法创建的 destination,提供给 router
@property (nonatomic, strong, nullable) id<PersonTypeFactory> makedDestination;
@end
@implementation PersonModuleConfiguration
// 工厂方法
-(id<PersonTypeFactory>)makeDestinationWith:(NSString *)name {
self.makedDestination = [[Person alloc] initWithName:name];
return self.makedDestination;
}
@end


在 router 中使用自定义 configuration:

1
2
3
4
5
6
7
8
9
10
11
class PersonRouter: ZIKServiceRouter<Person, PersonModuleConfiguration> {
// 重写 defaultRouteConfiguration,使用自定义 configuration
override class func defaultRouteConfiguration() -> PersonModuleConfiguration {
return PersonModuleConfiguration()
}
override func destination(with configuration: PersonModuleConfiguration) -> Person? {
// 使用工厂方法创建的 destination
return config.makedDestination
}
}
Objective-C示例

1
2
3
4
5
6
7
8
9
10
11
12
13
14
15
@interface PersonRouter: ZIKServiceRouter<id<PersonType>, PersonModuleConfiguration *>
@end
@implementation PersonRouter
// 重写 defaultRouteConfiguration,使用自定义 configuration
+ (PersonModuleConfiguration *)defaultRouteConfiguration {
return [PersonModuleConfiguration new];
}
- (nullable id<PersonType>)destinationWithConfiguration:(PersonModuleConfiguration *)configuration {
// 使用工厂方法创建的 destination
return configuration.makedDestination;
}
@end


然后把PersonTypeFactory协议和 router 进行注册:

1
PersonRouter.register(RoutableServiceModule<PersonTypeFactory>())
Objective-C示例

1
[PersonRouter registerModuleProtocol:ZIKRoutable(PersonTypeFactory)];


就可以用PersonTypeFactory获取模块了:

1
2
3
4
5
let name: String = ...
Router.makeDestination(to: RoutableServiceModule<PersonTypeFactory>(), configuring: { (config, _) in
// config 遵守 PersonTypeFactory
config.makeDestinationWith(name)
})
Objective-C示例

1
2
3
4
5
NSString *name = ...
ZIKRouterToServiceModule(PersonTypeFactory) makeDestinationWithConfiguring:^(ZIKPerformRouteConfiguration<PersonTypeFactory> *config) {
// config 遵守 PersonTypeFactory
[config makeDestinationWith:name];
}]


用泛型代替 configuration 子类

如果你不需要在 configuration 上保存其他自定义参数,也不想创建过多的 configuration 子类,可以用一个通用的泛型类来实现子类重写的效果。

泛型可以自定义参数类型,此时可以直接把工厂方法用 block 保存在 configuration 的属性上。

1
2
3
4
5
// 通用 configuration,可以提供自定义工厂方法
class ServiceMakeableConfiguration<Destination, Constructor>: PerformRouteConfig {
public var makeDestinationWith: Constructor
public var makedDestination: Destination?
}
Objective-C示例

1
2
3
4
@interface ZIKServiceMakeableConfiguration<__covariant Destination>: ZIKPerformRouteConfiguration
@property (nonatomic, copy) Destination(^makeDestinationWith)();
@property (nonatomic, strong, nullable) Destination makedDestination;
@end


在 router 中使用自定义 configuration:

1
2
3
4
5
6
7
8
9
10
11
12
13
14
15
16
17
18
19
20
21
22
23
24
25
26
class PersonRouter: ZIKServiceRouter<Person, PerformRouteConfig> {
// 重写 defaultRouteConfiguration,使用自定义 configuration
override class func defaultRouteConfiguration() -> PerformRouteConfig {
let config = ServiceMakeableConfiguration<PersonType, (String) -> PersonType>({ _ in})
// 设置工厂方法,让调用者使用
config.makeDestinationWith = { [unowned config] name in
config.makedDestination = Person(name: name)
return config.makedDestination
}
return config
}
override func destination(with configuration: PerformRouteConfig) -> Person? {
if let config = configuration as? ServiceMakeableConfiguration<PersonType, (String) -> PersonType> {
// 使用工厂方法创建的 destination
return config.makedDestination
}
return nil
}
}
// 让对应泛型的 configuration 遵守 PersonTypeFactory
extension ServiceMakeableConfiguration: PersonTypeFactory where Destination == PersonType, Constructor == (String) -> PersonType {
}
Objective-C示例

1
2
3
4
5
6
7
8
9
10
11
12
13
14
15
16
17
18
19
20
21
22
@interface PersonRouter: ZIKServiceRouter<id<PersonType>, ZIKServiceMakeableConfiguration *>
@end
@implementation PersonRouter
// 重写 defaultRouteConfiguration,使用自定义 configuration
+ (ZIKServiceMakeableConfiguration *)defaultRouteConfiguration {
ZIKServiceMakeableConfiguration *config = [ZIKServiceMakeableConfiguration new];
__weak typeof(config) weakConfig = config;
// 设置工厂方法,让调用者使用
config.makeDestinationWith = id ^(NSString *name) {
weakConfig.makedDestination = [[Person alloc] initWithName:name];
return weakConfig.makedDestination;
};
return config;
}
- (nullable id<PersonType>)destinationWithConfiguration:(ZIKServiceMakeableConfiguration *)configuration {
// 使用工厂方法创建的 destination
return configuration.makedDestination;
}
@end


避免接口污染

除了必需依赖,还有一些参数是不属于 destination 类的,而是属于模块内其他组件的,也不能通过 destination 的接口来传递。例如 MVVM 和 VIPER 架构中,model 参数不能传给 view,而是应该交给 view model 或者 interactor。此时可以使用相同的模式。

1
2
3
4
protocol EditorViewModuleInput {
// 工厂方法,声明了参数 note,返回 EditorViewInput 类型的 destination
func makeDestinationWith(_ note: Note) -> EditorViewInput?
}
Objective-C示例

1
2
3
4
@protocol EditorViewModuleInput: ZIKViewModuleRoutable
// 工厂方法,声明了参数 note,返回 EditorViewInput 类型的 destination
- (id<EditorViewInput>)makeDestinationWith:(Note *)note;
@end


1
2
3
4
5
6
7
8
9
10
11
12
13
14
15
16
17
18
19
20
21
22
23
24
25
26
27
28
29
30
class EditorViewRouter: ZIKViewRouter<EditorViewInput, ViewRouteConfig> {
// 重写 defaultRouteConfiguration,使用自定义 configuration
override class func defaultRouteConfiguration() -> ViewRouteConfig {
let config = ViewMakeableConfiguration<EditorViewInput, (Note) -> EditorViewInput>({ _ in})
// 设置工厂方法,让调用者使用
config.makeDestinationWith = { [unowned config] note in
config.makedDestination = self.makeDestinationWith(note: note)
return config.makedDestination
}
return config
}
class func makeDestinationWith(note: Note) -> EditorViewInput {
let view = EditorViewController()
let presenter = EditorViewPresenter(view)
let interactor = EditorInteractor(Presenter)
// 把 model 传递给数据管理者,view 不接触 model
interactor.note = note
return view
}
override func destination(with configuration: ViewRouteConfig) -> EditorViewInput? {
if let config = configuration as? ViewMakeableConfiguration<EditorViewInput, (Note) -> EditorViewInput> {
// 使用工厂方法创建的 destination
return config.makedDestination
}
return nil
}
}
Objective-C示例

1
2
3
4
5
6
7
8
9
10
11
12
13
14
15
16
17
18
19
20
21
22
23
24
25
26
27
28
29
30
31
@interface EditorViewRouter: ZIKViewRouter<id<EditorViewInput>, ZIKViewMakeableConfiguration *>
@end
@implementation PersonRouter
// 重写 defaultRouteConfiguration,使用自定义 configuration
+ (ZIKViewMakeableConfiguration *)defaultRouteConfiguration {
ZIKViewMakeableConfiguration *config = [ZIKViewMakeableConfiguration new];
__weak typeof(config) weakConfig = config;
// 设置工厂方法,让调用者使用
config.makeDestinationWith = id ^(Note *note) {
weakConfig.makedDestination = [self makeDestinationWith:note];
return weakConfig.makedDestination;
};
return config;
}
+ (id<EditorViewInput>)makeDestinationWith:(Note *)note {
EditorViewController *view = [[EditorViewController alloc] init];
EditorViewPresenter *presenter = [[EditorViewPresenter alloc] initWithView:view];
EditorInteractor *interactor = [[EditorInteractor alloc] initWithPresenter:presenter];
// 把 model 传递给数据管理者,view 不接触 model
interactor.note = note;
return view;
}
- (nullable id<EditorViewInput>)destinationWithConfiguration:(ZIKViewMakeableConfiguration *)configuration {
// 使用工厂方法创建的 destination
return configuration.makedDestination;
}
@end


就可以用EditorViewModuleInput获取模块了:

1
2
3
4
5
let note: Note = ...
Router.makeDestination(to: RoutableViewModule<EditorViewModuleInput>(), configuring: { (config, _) in
// config 遵守 EditorViewModuleInput
config.makeDestinationWith(note)
})
Objective-C示例

1
2
3
4
5
Note *note = ...
ZIKRouterToViewModule(EditorViewModuleInput) makeDestinationWithConfiguring:^(ZIKViewRouteConfiguration<EditorViewModuleInput> *config) {
// config 遵守 EditorViewModuleInput
config.makeDestinationWith(note);
}]


依赖查找

当模块的必需依赖很多时,如果把依赖都放在初始化接口中,就会出现一个非常长的方法。

除了让模块把依赖声明在接口中,模块内部也可以用模块管理工具动态查找依赖,例如用 router 查找 protocol 对应的模块。如果要使用这种模式,那么所有模块都需要统一使用相同的模块管理工具。

代码如下:

1
2
3
4
5
class EditorViewController: UIViewController {
lazy var storageService: EditorStorageServiceInput {
return Router.makeDestination(to: RoutableService<EditorStorageServiceInput>())!
}
}
Objective-C示例

1
2
3
4
5
6
7
8
9
10
11
12
13
@interface EditorViewController : UIViewController()
@property (nonatomic, strong) id<EditorStorageServiceInput> storageService;
@end
@implementation EditorViewController
- (id<EditorStorageServiceInput>)storageService {
if (!_storageService) {
_storageService = [ZIKRouterToService(EditorStorageServiceInput) makeDestination];
}
return _storageService;
}
@end


循环依赖

使用依赖注入时,有些特殊情况需要处理,例如循环依赖的无限递归问题。

循环依赖是指两个对象互相依赖。

在 router 内部动态注入依赖时,如果注入的依赖同时依赖于被注入的对象,则必须在 protocol 中声明。

1
2
3
4
5
6
7
8
9
10
11
12
13
14
15
16
17
protocol Parent {
// Parent 依赖 Child
var child: Child { get set }
}
protocol Child {
// Child 依赖 Parent
var parent: Parent { get set }
}
class ParentObject: Parent {
var child: Child!
}
class ChildObject: Child {
var parent: Parent!
}
Objective-C示例

1
2
3
4
5
6
7
8
9
10
11
12
13
14
15
@protocol Parent <ZIKServiceRoutable>
// Parent 依赖 Child
@property (nonatomic, strong) id<Child> child;
@end
@protocol Child <ZIKServiceRoutable>
// Child 依赖 Parent
@property (nonatomic, strong) id<Parent> parent;
@end
@interface ParentObject: NSObject<Parent>
@end
@interface ParentObject: NSObject<Child>
@end


1
2
3
4
5
6
7
8
9
10
11
12
13
14
15
16
17
18
19
20
21
22
23
24
25
26
27
28
29
30
31
32
33
34
35
class ParentRouter: ZIKServiceRouter<ParentObject, PerformRouteConfig> {
override func destination(with configuration: PerformRouteConfig) -> ParentObject? {
return ParentObject()
}
override func prepareDestination(_ destination: ParentObject, configuration: PerformRouteConfig) {
guard destination.child == nil else {
return
}
// 只有在外部没有设置 child 时,才去主动寻找依赖
let child = Router.makeDestination(to RoutableService<Child>(), preparation { child in
// 设置 child 的依赖,防止 child 内部再去寻找 parent 依赖,导致循环
child.parent = destination
})
destination.child = child
}
}
class ChildRouter: ZIKServiceRouter<ChildObject, PerformRouteConfig> {
override func destination(with configuration: PerformRouteConfig) -> ChildObject? {
return ChildObject()
}
override func prepareDestination(_ destination: ChildObject, configuration: PerformRouteConfig) {
guard destination.parent == nil else {
return
}
// 只有在外部没有设置 parent 时,才去主动寻找依赖
let parent = Router.makeDestination(to RoutableService<Parent>(), preparation { parent in
// 设置 parent 的依赖,防止 parent 内部再去寻找 child 依赖,导致循环
parent.child = destination
})
destination.parent = parent
}
}
Objective-C示例

1
2
3
4
5
6
7
8
9
10
11
12
13
14
15
16
17
18
19
20
21
22
23
24
25
26
27
28
29
30
31
32
33
34
35
36
37
38
39
40
41
@interface ParentRouter: ZIKServiceRouter<ParentObject *, ZIKPerformRouteConfiguration *>
@end
@implementation ParentRouter
- (ParentObject *)destinationWithConfiguration:(ZIKPerformRouteConfiguration *)configuration {
return [ParentObject new];
}
- (void)prepareDestination:(ParentObject *)destination configuration:(ZIKPerformRouteConfiguration *)configuration {
if (destination.child) {
return;
}
// 只有在外部没有设置 child 时,才去主动寻找依赖
destination.child = [ZIKRouterToService(Child) makeDestinationWithPreparation:^(id<Child> child) {
// 设置 child 的依赖,防止 child 内部再去寻找 parent 依赖,导致循环
child.parent = destination;
}];
}
@end
@interface ChildRouter: ZIKServiceRouter<ChildObject *, ZIKPerformRouteConfiguration *>
@end
@implementation ChildRouter
- (ChildObject *)destinationWithConfiguration:(ZIKPerformRouteConfiguration *)configuration {
return [ChildObject new];
}
- (void)prepareDestination:(ChildObject *)destination configuration:(ZIKPerformRouteConfiguration *)configuration {
if (destination.parent) {
return;
}
// 只有在外部没有设置 parent 时,才去主动寻找依赖
destination.parent = [ZIKRouterToService(Parent) makeDestinationWithPreparation:^(id<Parent> parent) {
// 设置 parent 的依赖,防止 parent 内部再去寻找 child 依赖,导致循环
parent.child = destination;
}];
}
@end


这样就能避免循环依赖导致的无限递归问题。

模块适配器

当使用 protocol 管理模块时,protocol 必定会出现在多个模块中。那么此时如何让每个模块单独编译呢?

一个方式是把 protocol 在每个用到的模块里复制一份,而且无需修改 protocol 名,Xcode 不会报错。

另一个方式是使用适配器模式,可以让不同模块使用各自不同的 protocol 和同一个模块交互。

required protocol 和 provided protocol

你可以为同一个 router 注册多个 protocol。

根据依赖关系,接口可以分为required protocolprovided protocol。模块本身提供的接口是provided protocol,模块的调用者需要使用的接口是required protocol

required protocolprovided protocol的子集,调用者只需要声明自己用到的那些接口,不必引入整个provided protocol,这样可以让模块间的耦合进一步减少。

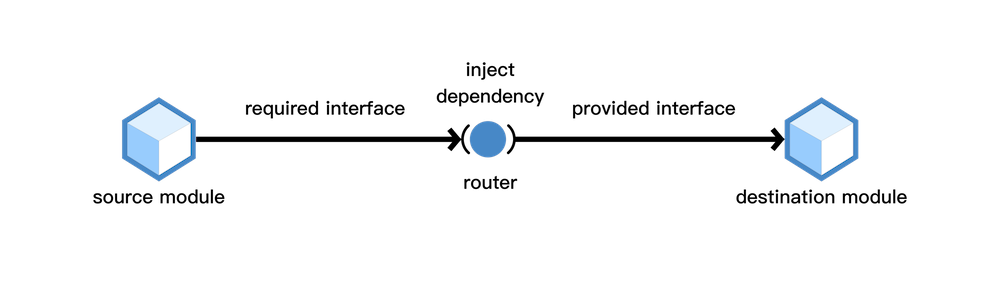
在 UML 的组件图中,就很明确地表现出了这两者的概念。下图中的半圆就是Required Interface,框外的圆圈就是Provided Interface

组件图

那么如何实施Required InterfaceProvided Interface?从架构分层上看,所有的模块都是依附于一个更上层的宿主 app 环境存在的,应该由使用这些模块的宿主 app 在一个 adapter 里进行接口适配,从而使得调用者可以继续在内部使用required protocol,adapter 负责把required protocol和修改后的provided protocol进行适配。整个过程模块都无感知。

这时候,调用者中定义的required protocol就相当于是在声明自己所依赖的外部模块。

provided模块添加required protocol

模块适配的工作全部由模块的使用和装配者 App Context 完成,最少时只需要两行代码。

例如,某个模块需要展示一个登陆界面,而且这个登陆界面可以显示一段自定义的提示语。

调用者模块示例:

1
2
3
4
5
6
7
8
9
// 调用者中声明的依赖接口,表明自身依赖一个登陆界面
protocol RequiredLoginViewInput {
var message: String? { get set } //显示在登陆界面上的自定义提示语
}
// 调用者中调用 login 模块
Router.makeDestination(to: RoutableView<RequiredLoginViewInput>(), preparation: {
destination.message = "请登录"
})
Objective-C示例

1
2
3
4
5
6
7
8
9
// 调用者中声明的依赖接口,表明自身依赖一个登陆界面
@protocol RequiredLoginViewInput <ZIKViewRoutable>
@property (nonatomic, copy) NSString *message;
@end
// 调用者中调用 login 模块
[ZIKRouterToView(RequiredLoginViewInput) makeDestinationWithPraparation:^(id<RequiredLoginViewInput> destination) {
destination.message = @"请登录";
}];


实际登陆界面提供的接口则是ProvidedLoginViewInput

1
2
3
4
// 实际登陆界面提供的接口
protocol ProvidedLoginViewInput {
var message: String? { get set }
}
Objective-C示例

1
2
3
4
// 实际登陆界面提供的接口
@protocol ProvidedLoginViewInput <ZIKViewRoutable>
@property (nonatomic, copy) NSString *message;
@end


适配的代码由宿主 app 实现,让登陆界面支持 RequiredLoginViewInput

1
2
3
// 让模块支持 required protocol,只需要添加一个 protocol 扩展即可
extension LoginViewController: RequiredLoginViewInput {
}
Objective-C示例
1
2
3
4
5
// 让模块支持 required protocol,只需要添加一个 protocol 扩展即可
@interface LoginViewController (ModuleAAdapter) <RequiredLoginViewInput>
@end
@implementation LoginViewController (ModuleAAdapter)
@end


并且让登陆界面的 router 也支持 RequiredLoginViewInput

1
2
3
4
// 如果可以获取到 router 类,可以直接为 router 添加 RequiredLoginViewInput
LoginViewRouter.register(RoutableView<RequiredLoginViewInput>())
// 如果不能得到对应模块的 router,可以用 adapter 进行转发
ZIKViewRouteAdapter.register(adapter: RoutableView<RequiredLoginViewInput>(), forAdaptee: RoutableView<ProvidedLoginViewInput>())
Objective-C示例
1
2
3
4
//如果可以获取到 router 类,可以直接为 router 添加 RequiredLoginViewInput
[LoginViewRouter registerViewProtocol:ZIKRoutable(RequiredLoginViewInput)];
//如果不能得到对应模块的 router,可以注册 adapter
[self registerDestinationAdapter:ZIKRoutable(RequiredLoginViewInput) forAdaptee:ZIKRoutable(ProvidedLoginViewInput)];


适配之后,RequiredLoginViewInput就能和ProvidedLoginViewInput一样使用,获取到同一个模块了:

调用者模块示例:

1
2
3
4
5
6
7
8
Router.makeDestination(to: RoutableView<RequiredLoginViewInput>(), preparation: {
destination.message = "请登录"
})
// ProvidedLoginViewInput 和 RequiredLoginViewInput 能获取到同一个 router
Router.makeDestination(to: RoutableView<ProvidedLoginViewInput>(), preparation: {
destination.message = "请登录"
})
Objective-C示例

1
2
3
4
5
6
7
8
[ZIKRouterToView(RequiredLoginViewInput) makeDestinationWithPraparation:^(id<RequiredLoginViewInput> destination) {
destination.message = @"请登录";
}];
// ProvidedLoginViewInput 和 RequiredLoginViewInput 能获取到同一个 router
[ZIKRouterToView(RequiredLoginViewInput) makeDestinationWithPraparation:^(id<ProvidedLoginViewInput> destination) {
destination.message = @"请登录";
}];


接口适配

有时候ProvidedLoginViewInputRequiredLoginViewInput的接口名可能会稍有不同,此时需要用 category、extension、子类、proxy 类等方式进行接口适配。

1
2
3
protocol ProvidedLoginViewInput {
var notifyString: String? { get set } // 接口名不同
}
Objective-C示例

1
2
3
@protocol ProvidedLoginViewInput <NSObject>
@property (nonatomic, copy) NSString *notifyString; // 接口名不同
@end


适配时需要进行接口转发,让登陆界面支持 RequiredLoginViewInput

1
2
3
4
5
6
7
8
9
10
extension LoginViewController: RequiredLoginViewInput {
var message: String? {
get {
return notifyString
}
set {
notifyString = newValue
}
}
}
Objective-C示例

1
2
3
4
5
6
7
8
9
10
11
@interface LoginViewController (ModuleAAdapter) <RequiredLoginViewInput>
@property (nonatomic, copy) NSString *message;
@end
@implementation LoginViewController (ModuleAAdapter)
- (void)setMessage:(NSString *)message {
trueself.notifyString = message;
}
- (NSString *)message {
truereturn self.notifyString;
}
@end


用中介者转发接口

如果不能直接为模块添加required protocol,比如 protocol 里的一些 delegate 需要兼容:

1
2
3
4
5
6
7
protocol RequiredLoginViewDelegate {
func didFinishLogin() -> Void
}
protocol RequiredLoginViewInput {
var message: String? { get set }
var delegate: RequiredLoginViewDelegate { get set }
}
Objective-C示例

1
2
3
4
5
6
7
8
@protocol RequiredLoginViewDelegate <NSObject>
- (void)didFinishLogin;
@end
@protocol RequiredLoginViewInput <ZIKViewRoutable>
@property (nonatomic, copy) NSString *message;
@property (nonatomic, weak) id<RequiredLoginViewDelegate> delegate;
@end


而模块里的 delegate 接口不一样:

1
2
3
4
5
6
7
protocol ProvidedLoginViewDelegate {
func didLogin() -> Void
}
protocol ProvidedLoginViewInput {
var notifyString: String? { get set }
var delegate: ProvidedLoginViewDelegate { get set }
}
Objective-C示例

1
2
3
4
5
6
7
8
@protocol ProvidedLoginViewDelegate <NSObject>
- (void)didLogin;
@end
@protocol ProvidedLoginViewInput <ZIKViewRoutable>
@property (nonatomic, copy) NSString *notifyString;
@property (nonatomic, weak) id<ProvidedLoginViewDelegate> delegate;
@end


相同方法有不同参数类型时,可以用一个新的 router 代替真正的 router,在新的 router 里插入一个中介者,负责转发接口:

1
2
3
4
5
6
7
8
9
class ReqiredLoginViewRouter: ProvidedLoginViewRouter {
override func destination(with configuration: ZIKViewRouteConfiguration) -> RequiredLoginViewInput? {
let realDestination: ProvidedLoginViewInput = super.destination(with configuration)
// proxy 负责把 RequiredLoginViewInput 转发为 ProvidedLoginViewInput
let proxy: RequiredLoginViewInput = ProxyForDestination(realDestination)
return proxy
}
}
Objective-C示例

1
2
3
4
5
6
7
8
9
10
11
@interface ReqiredLoginViewRouter : ProvidedLoginViewRouter
@end
@implementation RequiredLoginViewRouter
- (id)destinationWithConfiguration:(ZIKViewRouteConfiguration *)configuration {
id<ProvidedLoginViewInput> realDestination = [super destinationWithConfiguration:configuration];
// proxy 负责把 RequiredLoginViewInput 转发为 ProvidedLoginViewInput
id<RequiredLoginViewInput> proxy = ProxyForDestination(realDestination);
return mediator;
}
@end


对于普通OC类,proxy 可以用 NSProxy 来实现。对于 UIKit 中的那些复杂的 UI 类,或者 Swift 类,可以用子类,然后在子类中重写方法,进行模块适配。

声明式依赖

利用之前的静态路由检查机制,模块只需要声明 required 接口,就能保证对应的模块必定存在。

模块无需在自己的接口里声明依赖,如果模块需要新增依赖,只需要创建新的 required 接口即可,无需修改接口本身。这样也能避免依赖变动导致的接口变化,减少接口维护的成本。

模块提供默认的依赖配置

每次引入模块,宿主 app 都需要写一份适配代码,虽然大多数情况下只有两行,但是我们想尽量减少宿主 app 的维护职责。

此时,可以让模块提供一份默认的依赖,用宏定义包裹,绕过编译检查。

1
2
3
4
5
6
7
8
9
10
11
12
13
#if USE_DEFAULT_DEPENDENCY
import ProvidedLoginModule
public func registerDefaultDependency() {
ZIKViewRouteAdapter.register(adapter: RoutableView<RequiredLoginViewInput>(), forAdaptee: RoutableView<ProvidedLoginViewInput>())
}
extension ProvidedLoginViewController: RequiredLoginViewInput {
}
#endif
Objective-C示例

1
2
3
4
5
6
7
8
9
10
11
12
13
14
15
16
#if USE_DEFAULT_DEPENDENCY
@import ProvidedLoginModule;
static inline void registerDefaultDependency() {
[ZIKViewRouteAdapter registerDestinationAdapter:ZIKRoutable(RequiredLoginViewInput) forAdaptee:ZIKRoutable(ProvidedLoginViewInput)];
}
// 宏定义,默认的适配代码
#define ADAPT_DEFAULT_DEPENDENCY \
@interface ProvidedLoginViewController (Adapter) <RequiredLoginViewInput> \
@end \
@implementation ProvidedLoginViewController (Adapter) \
@end \
#endif


如果宿主 app 要使用默认依赖,就在.xcconfig里设置Preprocessor Macros,开启宏定义:

1
GCC_PREPROCESSOR_DEFINITIONS = $(inherited) USE_DEFAULT_DEPENDENCY=1

如果是 Swift 模块,需要在模块的 target 里设置Active Compilation Conditions,添加编译宏USE_DEFAULT_DEPENDENCY

宿主 app 直接调用默认的适配代码即可,不用再负责维护:

1
2
3
4
5
public func registerAdapters() {
// 注册默认的依赖
registerDefaultDependency()
...
}
Objective-C示例

1
2
3
4
5
6
7
8
void registerAdapters() {
// 注册默认的依赖
registerDefaultDependency();
...
}
// 使用默认的适配代码
ADAPT_DEFAULT_DEPENDENCY


如果宿主 app 需要替换使用另一个 provided 模块,可以关闭宏定义,再写一份另外的适配代码,即可替换依赖。

模块化

区分了required protocolprovided protocol后,就可以实现真正的模块化。在调用者声明了所需要的required protocol后,被调用模块就可以随时被替换成另一个相同功能的模块。

参考 demo 中的ZIKLoginModule示例模块,登录模块依赖于一个弹窗模块,而这个弹窗模块在ZIKRouterDemoZIKRouterDemo-macOS中是不同的,而在切换弹窗模块时,登录模块中的代码不需要做任何改变。

使用 adapter 的规范

一般来说,并不需要立即把所有的 protocol 都分离为required protocolprovided protocol。调用模块和目的模块可以暂时共用 protocol,或者只是简单地改个名字,让required protocol作为provided protocol的子集,在第一次需要替换模块的时候再用 category、extension、proxy、subclass 等技术进行接口适配。

接口适配也不能滥用,因为成本比较高,而且并非所有的接口都能适配,例如同步接口和异步接口就难以适配。

对于模块间耦合的处理,有这么几条建议:

  • 如果依赖的是提供特定功能的模块,没有通用性,直接引用类即可
  • 如果是依赖某些简单的通用模块(例如日志模块),可以在模块的接口上把依赖交给外部来设置,例如 block 的形式
  • 大部分需要解耦的模块都是需要重用的业务模块,如果你的模块不需要重用,并且也不需要分工开发,直接引用对应类即可
  • 大部分情况下建议共用 protocol,或者让required protocol作为provided protocol的子集,接口名保持一致
  • 只有在你的业务模块的确允许使用者使用不同的依赖模块时,才进行多个接口间的适配。例如需要跨平台的模块,例如登录界面模块允许不同的 app 使用不同的登陆 service 模块

通过required protocolprovided protocol,我们就实现了模块间的完全解耦。

模块间通信

模块间通信有多种方式,解耦程度也各有不同。这里只讨论接口交互的方式。

控制流 input 和 output

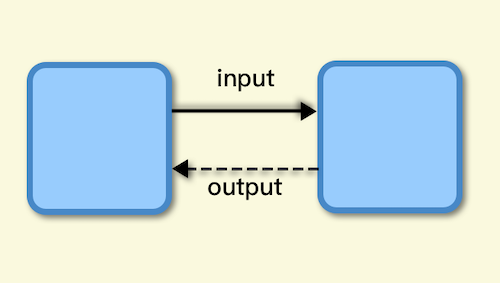
模块的对外接口可以分为 input 和 output。两者的区别主要是控制流的主动权归属不同。

Input 是由外部主动调用的接口,控制流的发起者在外部,例如外部调用 view 的 UI 修改接口。

Output 是模块内部主动调用外部实现的接口,控制流的发起者在内部,需要外部实现 output 所要求的方法。例如输出 UI 事件、事件回调、获取外部的 dataSource。iOS 中常用的 delegate 模式,也是一种 output。

设置 input 和 output

模块设计好 input 和 output,然后在模块创建的时候,设置好模块之间的 input 和 output 关系,即可配置好模块间通信,同时充分解耦。

1
2
3
4
5
6
7
8
9
10
11
12
class NoteListViewController: UIViewController, EditorViewOutput {
func showEditor() {
let destination = Router.makeDestination(to: RoutableView<EditorViewInput>(), preparation: { [weak self] destination in
destination.output = self
})
present(destination, animated: true)
}
}
protocol EditorViewInput {
weak var output: EditorViewOutput? { get set }
}

子模块

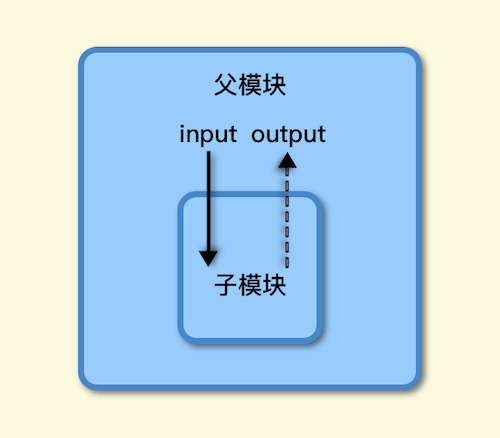
大部分方案都没有讨论子模块存在的情况。如果使用了 MVVM 或者 VIPER 架构,此时一个 view controller 使用了 child view controller,那多个模块的 view model 和 interactor 之间如何交互?子模块由谁初始化、由谁管理?

有些方案是直接在父 view model 里创建和使用子 view model,但是这样就导致了 view 的实现方式影响了view model 的实现,如果父 view 里替换使用了另一个子 view,那父 view model 里的代码也需要修改。

子模块的来源

子模块的来源有:

  • 父 view 引用了一个封装好的子 view 控件,连带着引入了子 view 的整个 MVVM 或者 VIPER 模块
  • View model 或者 interactor 里使用了一个 Service

通信方式

子 view 可能是一个 UIView,也可能是一个 Child UIViewController。因此子 view 有可能需要向外部请求数据,也可能独立完成所有任务,不需要依赖父模块。

如果子 view 可以独立,那在子模块里不会出现和父模块交互的逻辑,只有把一些事件通过 output 传递出去的接口。这时只需要把子 view 的 input 接口封装在父 view 的 input 接口里即可,父 view model / presenter / interactor 是不知道父 view 提供的这几个接口是通过子 view 实现的。

如果父模块需要调用子模块的业务接口,或接收子模块的数据或业务事件,并且不想影响 view 的接口,可以把子 view model / presenter / interactor 作为父 view model / presenter / interactor 的一个 service,在引入子模块时,注入到父 view model / presenter / interactor,从而绕过 view 层。这样子模块和父模块就能通过 service 的形式进行通信了,而这时,父模块也不知道这个 service 是来自子模块里的。

在这样的设计下,子模块和父模块是不知道彼此的存在的,只是通过接口进行交互。好处是父 view 如果想要更换为另一个相同功能的子 view 控件,就只需要在父 view 里修改,不会影响其他的 view model / presenter / interactor。

父模块:

1
2
3
4
5
6
7
8
9
10
11
12
13
14
15
16
17
class EditorViewController: UIViewController {
var viewModel: EditorViewModel!
func addTextView() {
let textViewController = Router.makeDestination(to: RoutableView<TextViewInput>()) { (destination) in
// 设置模块间交互
// 原本父 view 是无法接触到子模块的 view model / presenter / interactor
// 此时子模块是把这些内部组件作为业务 input 开放给了外部
self.viewModel.textService = destination.viewModel
destination.viewModel.output = self.viewModel
}
addChildViewController(textViewController)
view.addSubview(textViewController.view)
textViewController.didMove(toParentViewController: self)
}
}
Objective-C Sample

1
2
3
4
5
6
7
8
9
10
11
12
13
14
15
16
17
18
19
20
@interface EditorViewController: UIViewController
@property (nonatomic, strong) id<EditorViewModel> viewModel;
@end
@implementation EditorViewController
- (void)addTextView {
UIViewController *textViewController = [ZIKRouterToView(TextViewInput) makeDestinationWithPreparation:^(id<TextViewInput> destination) {
// 设置模块间交互
// 原本父 view 是无法接触到子模块的 view model / presenter / interactor
// 此时子模块是把这些内部组件作为业务 input 开放给了外部
self.viewModel.textService = destination.viewModel;
destination.viewModel.output = self.viewModel;
}];
[self addChildViewController:textViewController];
[self.view addSubview: textViewController.view];
[textViewController didMoveToParentViewController: self];
}
@end


子模块:

1
2
3
4
5
6
7
8
9
protocol TextViewInput {
weak var output: TextViewModuleOutput? { get set }
var viewModel: TextViewModel { get }
}
class TextViewController: UIViewController, TextViewInput {
weak var output: TextViewModuleOutput?
var viewModel: TextViewModel!
}
Objective-C Sample

1
2
3
4
5
6
7
8
9
@protocol TextViewInput <ZIKViewRoutable>
@property (nonatomic, weak) id<TextViewModuleOutput> output;
@property (nonatomic, strong) id<TextViewModel> viewModel;
@end
@interface TextViewController: UIViewController <TextViewInput>
@property (nonatomic, weak) id<TextViewModuleOutput> output;
@property (nonatomic, strong) id<TextViewModel> viewModel;
@end


Output 的适配

在使用 output 时,模块适配会带来一定麻烦。

例如这样一对 required-provided protocol:

1
2
3
4
5
6
7
protocol RequiredEditorViewInput {
weak var output: RequiredEditorViewOutput? { get set }
}
protocol ProvidedEditorViewInput {
weak var output: ProvidedEditorViewOutput? { get set }
}
Objective-C Sample

1
2
3
4
5
6
7
@protocol RequiredEditorViewInput <NSObject>
@property (nonatomic, weak) id<RequiredEditorViewOutput> output;
@end
@protocol ProvidedEditorViewInput <NSObject>
@property (nonatomic, weak) id<ProvidedEditorViewOutput> output;
@end


由于 output 的实现者不是固定的,因此无法让所有的 output 类都同时适配RequiredEditorViewOutputProvidedEditorViewOutput。此时建议直接使用对应的 protocol,不使用 required-provided 模式。

如果你仍然想要使用 required-provided 模式,那就需要用工厂模式来传递 output ,在内部用 proxy 进行适配。

实际模块的 router:

1
2
3
4
5
6
7
8
9
10
11
12
13
14
15
16
17
18
19
20
21
22
23
24
25
26
27
28
protocol ProvidedEditorViewModuleInput {
var makeDestinationWith(_ output: ProvidedEditorViewOutput?) -> ProvidedEditorViewInput? { get set }
}
class ProvidedEditorViewRouter: ZIKViewRouter<EditorViewController, ViewRouteConfig> {
override class func registerRoutableDestination() {
register(RoutableViewModule<ProvidedEditorViewModuleInput>())
}
override class func defaultRouteConfiguration() -> ViewRouteConfig {
let config = ViewMakeableConfiguration<ProvidedViewInput, (ProvidedEditorViewOutput?) -> ProvidedViewInput?>({ _ in})
config.makeDestinationWith = { [unowned config] output in
// 设置 output
let viewModel = EditorViewModel(output: output)
config.makedDestination = EditorViewController(viewModel: viewModel)
return config.makedDestination
}
return config
}
override func destination(with configuration: ViewRouteConfig) -> EditorViewController? {
if let config = configuration as? ViewMakeableConfiguration<ProvidedViewInput, (ProvidedEditorViewOutput?) {
return config.makedDestination
}
return nil
}
}
Objective-C Sample

1
2
3
4
5
6
7
8
9
10
11
12
13
14
15
16
17
18
19
20
21
22
23
24
25
26
27
28
29
30
@protocol ProvidedEditorViewModuleInput <ZIKViewModuleRoutable>
@property (nonatomic, readonly) id<ProvidedEditorViewInput> (makeDestinationWith)(id<ProvidedEditorViewOutput> output);
@end
@interface ProvidedEditorViewRouter: ZIKViewRouter
@end
@implementation ProvidedEditorViewRouter
+ (void)registerRoutableDestination {
[self registerModuleProtocol:ZIKRoutable(ProvidedEditorViewModuleInput)];
}
+ (ZIKViewMakeableConfiguration *)defaultRouteConfiguration {
ZIKViewMakeableConfiguration *config = [ZIKViewMakeableConfiguration new];
__weak typeof(config) weakConfig = config;
config.makeDestinationWith = id ^(id<ProvidedEditorViewOutput> output) {
// 设置 output
EditorViewModel *viewModel = [[EditorViewModel alloc] initWithOutput:output];
weakConfig.makedDestination = [[EditorViewController alloc] initWithViewModel:viewModel];
return weakConfig.makedDestination;
};
return config;
}
- (nullable id<PersonType>)destinationWithConfiguration:(ZIKServiceMakeableConfiguration *)configuration {
return configuration.makedDestination;
}
@end


适配代码:

1
2
3
4
5
6
7
8
9
10
11
12
13
14
15
16
17
18
19
20
21
22
23
24
25
26
27
28
29
protocol RequiredEditorViewModuleInput {
var makeDestinationWith(_ output: RequiredEditorViewOutput?) -> RequiredEditorViewInput? { get set }
}
// 用于适配的 required router
class RequiredEditorViewRouter: ProvidedEditorViewRouter {
override class func registerRoutableDestination() {
register(RoutableViewModule<RequiredEditorViewModuleInput>())
}
// 兼容 configuration
override class func defaultRouteConfiguration() -> PerformRouteConfig {
let config = super.defaultRouteConfiguration()
let makeDestinationWith = config.makeDestinationWith
config.makeDestinationWith = { requiredOutput in
// proxy 负责把 RequiredEditorViewOutput 转为 ProvidedEditorViewOutput
let providedOutput = EditorOutputProxy(forwarding: requiredOutput)
return makeDestinationWith(providedOutput)
}
return config
}
}
class EditorOutputProxy: ProvidedEditorViewOutput {
let forwarding: RequiredEditorViewOutput
// 实现 ProvidedEditorViewOutput,转发给 forwarding
}
Objective-C Sample

1
2
3
4
5
6
7
8
9
10
11
12
13
14
15
16
17
18
19
20
21
22
23
24
25
26
27
28
29
30
31
32
33
34
35
36
37
38
39
40
41
42
43
44
45
46
47
48
49
50
51
52
53
54
55
56
57
@protocol RequiredEditorViewModuleInput <ZIKViewModuleRoutable>
@property (nonatomic, readonly) id<RequiredEditorViewInput> (makeDestinationWith)(id<RequiredEditorViewOutput> output);
@end
// 用于适配的 required router
@interface RequiredEditorViewRouter: ProvidedEditorViewRouter
@end
@implementation RequiredEditorViewRouter
+ (void)registerRoutableDestination {
[self registerModuleProtocol:ZIKRoutable(RequiredEditorViewModuleInput)];
}
// 兼容 configuration
+ (ZIKViewMakeableConfiguration *)defaultRouteConfiguration {
ZIKViewMakeableConfiguration *config = [super defaultRouteConfiguration];
id<ProvidedEditorViewInput>(^makeDestinationWith)(id<ProvidedEditorViewOutput>) = config.makeDestinationWith;
config.makeDestinationWith = id ^(id<RequiredEditorViewOutput> requiredOutput) {
// proxy 负责把 RequiredEditorViewOutput 转为 ProvidedEditorViewOutput
EditorOutputProxy *providedOutput = [[EditorOutputProxy alloc] initWithForwarding: requiredOutput];
return makeDestinationWith(providedOutput);
};
return config;
}
- (nullable id<PersonType>)destinationWithConfiguration:(ZIKServiceMakeableConfiguration *)configuration {
return configuration.makedDestination;
}
@end
// 实现 ProvidedEditorViewOutput,转发给 forwarding
@interface EditorOutputProxy: NSProxy <ProvidedEditorViewOutput>
@property (nonatomic, strong) id forwarding;
@end
@implementation EditorOutputProxy
- (instancetype)initWithForwarding:(id)forwarding {
if (self = [super init]) {
_forwarding = forwarding;
}
return self;
}
- (BOOL)respondsToSelector:(SEL)aSelector {
return [self.forwarding respondsToSelector:aSelector];
}
- (BOOL)conformsToProtocol:(Protocol *)protocol {
return [self.forwarding conformsToProtocol:protocol];
}
- (id)forwardingTargetForSelector:(SEL)aSelector {
return self.forwarding;
}
@end


可以看到,output 的适配有些繁琐。因此除非你的模块是通用模块,有实际的解耦需求,否则直接使用 provided protocol 即可。

功能扩展

总结完使用接口进行模块解耦和依赖管理的方法,我们可以进一步对 router 进行扩展了。上面使用 makeDestination 创建模块是最基本的功能,使用 router 子类后,我们可以进行许多有用的功能扩展,这里给出一些示范。

自动注册

编写 router 代码时,需要注册 router 和 protocol 。在 OC 中可以在 +load 方法中注册,但是 Swift 里已经不能使用 +load 方法,而且分散在 +load 中的注册代码也不好管理。BeeHive 中通过宏定义和__attribute((used, section("__DATA,""BeehiveServices"""))),把注册信息添加到了 mach-O 中的自定义区域,然后在启动时读取并自动注册,可惜这种方式在 Swift 中也无法使用了。

我们可以把注册代码写在 router 的+registerRoutableDestination方法里,然后逐个调用每个 router 类的+registerRoutableDestination方法即可。还可以更进一步,用 runtime 技术遍历 mach-O 中的__DATA,__objc_classlist区域的类列表,获取所有的 router 类,自动调用所有的+registerRoutableDestination方法。

把注册代码统一管理之后,如果不想使用自动注册,也能随时切换为手动注册。

1
2
3
4
5
6
7
8
9
// editor 模块的 router
class EditorViewRouter: ZIKViewRouter {
override class func registerRoutableDestination() {
registerView(EditorViewController.self)
register(RoutableView<EditorViewProtocol>())
}
}
Objective-C Sample

1
2
3
4
5
6
7
8
9
10
11
@interface EditorViewRouter : ZIKViewRouter
@end
@implementation EditorViewRouter
+ (void)registerRoutableDestination {
[self registerView:[EditorViewController class]];
[self registerViewProtocol:ZIKRoutable(EditorViewProtocol)];
}
@end


封装界面跳转

iOS 中模块间耦合的原因之一,就是界面跳转的逻辑是通过 UIViewController 进行的,跳转功能被限制在了 view controller 上,导致数据流常常都绕不开 view 层。要想更好地管理跳转逻辑,就需要进行封装。

封装界面跳转可以屏蔽 UIKit 的细节,此时界面跳转的代码就可以放在非 view 层(例如 presenter、view model、interactor、service),并且能够跨平台,也能轻易地通过配置切换跳转方式。

如果是普通的模块,就用ZIKServiceRouter,而如果是界面模块,例如 UIViewControllerUIView,就可以用ZIKViewRouter,在其中封装了界面跳转功能。

封装界面跳转后,使用方式如下:

1
2
3
4
5
6
7
8
9
10
11
12
13
14
15
16
17
18
class TestViewController: UIViewController {
//直接跳转到 editor 界面
func showEditor() {
Router.perform(to: RoutableView<EditorViewProtocol>(), path: .push(from: self))
}
//跳转到 editor 界面,跳转前用 protocol 配置界面
func prepareAndShowEditor() {
Router.perform(
to: RoutableView<EditorViewProtocol>(),
path: .push(from: self),
preparation: { destination in
// 跳转前进行配置
// destination 自动推断为 EditorViewProtocol
})
}
}
Objective-C Sample

1
2
3
4
5
6
7
8
9
10
11
12
13
14
15
16
17
18
@implementation TestViewController
- (void)showEditor {
//直接跳转到 editor 界面
[ZIKRouterToView(EditorViewProtocol) performPath:ZIKViewRoutePath.pushFrom(self)];
}
- (void)prepareAndShowEditor {
//跳转到 editor 界面,跳转前用 protocol 配置界面
[ZIKRouterToView(EditorViewProtocol)
performPath:ZIKViewRoutePath.pushFrom(self)
preparation:^(id<EditorViewProtocol> destination) {
// 跳转前进行配置
// destination 自动推断为 EditorViewProtocol
}];
}
@end


可以用 ViewRoutePath 一键切换不同的跳转方式:

1
2
3
4
5
6
7
8
9
10
11
12
13
enum ViewRoutePath {
case push(from: UIViewController)
case presentModally(from: UIViewController)
case presentAsPopover(from: UIViewController, configure: ZIKViewRoutePopoverConfigure)
case performSegue(from: UIViewController, identifier: String, sender: Any?)
case show(from: UIViewController)
case showDetail(from: UIViewController)
case addAsChildViewController(from: UIViewController, addingChildViewHandler: (UIViewController, @escaping () -> Void) -> Void)
case addAsSubview(from: UIView)
case custom(from: ZIKViewRouteSource?)
case makeDestination
case extensible(path: ZIKViewRoutePath)
}

而且在界面跳转后,还可以根据跳转时的跳转方式,一键回退界面,无需再手动区分 dismiss、pop 等各种情况:

1
2
3
4
5
6
7
8
9
10
11
12
13
14
15
16
17
class TestViewController: UIViewController {
var router: DestinationViewRouter<EditorViewProtocol>?
func showEditor() {
// 持有 router
router = Router.perform(to: RoutableView<EditorViewProtocol>(), path: .push(from: self))
}
// Router 会对 editor view controller 执行 pop 操作,移除界面
func removeEditor() {
guard let router = router, router.canRemove else {
return
}
router.removeRoute()
router = nil
}
}
Objective-C Sample

1
2
3
4
5
6
7
8
9
10
11
12
13
14
15
16
17
18
19
20
@interface TestViewController()
@property (nonatomic, strong) ZIKDestinationViewRouter(id<EditorViewProtocol>) *router;
@end
@implementation TestViewController
- (void)showEditor {
// 持有 router
self.router = [ZIKRouterToView(EditorViewProtocol) performPath:ZIKViewRoutePath.pushFrom(self)];
}
// Router 会对 editor view controller 执行 pop 操作,移除界面
- (void)removeEditor {
if (![self.router canRemove]) {
return;
}
[self.router removeRoute];
self.router = nil;
}
@end


自定义跳转

有些界面的跳转方式很特殊,例如 tabbar 上的界面,需要通过切换 tabbar item 来进行。也有的界面有自定义的跳转动画,此时可以在 router 子类中重写对应方法,进行自定义跳转。

1
2
3
4
5
6
7
8
9
10
11
12
13
14
15
16
17
18
19
20
21
22
23
24
25
26
27
28
29
30
31
32
33
34
class EditorViewRouter: ZIKViewRouter<EditorViewController, ViewRouteConfig> {
override func destination(with configuration: ViewRouteConfig) -> Any? {
return EditorViewController()
}
override func canPerformCustomRoute() -> Bool {
return true
}
override func performCustomRoute(onDestination destination: EditorViewController, fromSource source: Any?, configuration: ViewRouteConfig) {
beginPerformRoute()
// 自定义跳转
CustomAnimator.transition(from: source, to: destination) {
self.endPerformRouteWithSuccess()
}
}
override func canRemoveCustomRoute() -> Bool {
return true
}
override func removeCustomRoute(onDestination destination: EditorViewController, fromSource source: Any?, removeConfiguration: ViewRemoveConfig, configuration: ViewRouteConfig) {
beginRemoveRoute(fromSource: source)
// 移除自定义跳转
CustomAnimator.dismiss(destination) {
self.endRemoveRouteWithSuccess(onDestination: destination, fromSource: source)
}
}
override class func supportedRouteTypes() -> ZIKViewRouteTypeMask {
return [.custom, .viewControllerDefault]
}
}
Objective-C Sample

1
2
3
4
5
6
7
8
9
10
11
12
13
14
15
16
17
18
19
20
21
22
23
24
25
26
27
28
29
30
31
32
33
34
35
36
37
38
@interface EditorViewRouter : ZIKViewRouter
@end
@implementation EditorViewRouter
- (EditorViewController *)destinationWithConfiguration:(ZIKViewRouteConfiguration *)configuration {
return [[EditorViewController alloc] init];
}
- (BOOL)canPerformCustomRoute {
return YES;
}
- (void)performCustomRouteOnDestination:(id)destination fromSource:(UIViewController *)source configuration:(ZIKViewRouteConfiguration *)configuration {
[self beginPerformRoute];
// 自定义跳转
[CustomAnimator transitionFrom:source to:destination completion:^{
[self endPerformRouteWithSuccess];
}];
}
- (BOOL)canRemoveCustomRoute {
return YES;
}
- (void)removeCustomRouteOnDestination:(id)destination fromSource:(UIViewController *)source removeConfiguration:(ZIKViewRemoveConfiguration *)removeConfiguration configuration:(__kindof ZIKViewRouteConfiguration *)configuration {
[self beginRemoveRouteFromSource:source];
// 移除自定义跳转
[CustomAnimator dismiss:destination completion:^{
[self endRemoveRouteWithSuccessOnDestination:destination fromSource:source];
}];
}
+ (ZIKViewRouteTypeMask)supportedRouteTypes {
return ZIKViewRouteTypeMaskCustom|ZIKViewRouteTypeMaskViewControllerDefault;
}
@end


支持 storyboard

很多项目使用了 storyboard,在进行模块化时,肯定不能要求所有使用 storyboard 的模块都改为使用代码。因此我们可以 hook 一些 storyboard 相关的方法,例如-prepareSegue:sender:,在其中调用prepareDestination:configuring:即可。

URL 路由

虽然之前列出了 URL 路由的许多缺点,但是如果你的模块需要从 h5 界面调用,例如电商 app 需要实现跨平台的动态路由规则,那么 URL 路由就是最佳的方案。

但是我们并不想为了实现 URL 路由,使用另一套框架再重新封装一次模块。只需要在 router 上扩展 URL 路由的功能,即可同时用接口和 URL 管理模块。

你可以给 router 注册 url:

1
2
3
4
5
6
class EditorViewRouter: ZIKViewRouter<EditorViewProtocol, ViewRouteConfig> {
override class func registerRoutableDestination() {
// 注册 url
registerURLPattern("app://editor/:title")
}
}
Objective-C Sample

1
2
3
4
5
6
7
8
@implementation EditorViewRouter
+ (void)registerRoutableDestination {
// 注册 url
[self registerURLPattern:@"app://editor/:title"];
}
@end


之后就可以用相应的 url 获取 router:

1
ZIKAnyViewRouter.performURL("app://editor/test_note", path: .push(from: self))
Objective-C Sample

1
[ZIKAnyViewRouter performURL:@"app://editor/test_note" path:ZIKViewRoutePath.pushFrom(self)];


以及处理 URL Scheme:

1
2
3
4
5
6
7
8
9
public func application(_ app: UIApplication, open url: URL, options: [UIApplicationOpenURLOptionsKey : Any] = [:]) -> Bool {
let urlString = url.absoluteString
if let _ = ZIKAnyViewRouter.performURL(urlString, fromSource: self.rootViewController) {
return true
} else if let _ = ZIKAnyServiceRouter.performURL(urlString) {
return true
}
return false
}
Objective-C Sample

1
2
3
4
5
6
7
8
- (BOOL)application:(UIApplication *)app openURL:(NSURL *)url options:(NSDictionary<UIApplicationOpenURLOptionsKey,id> *)options {
if ([ZIKAnyViewRouter performURL:urlString fromSource:self.rootViewController]) {
return YES;
} else if ([ZIKAnyServiceRouter performURL:urlString]) {
return YES;
}
return NO;
}


每个 router 子类还能各自对 url 进行进一步处理,例如处理 url 中的参数、通过 url 执行对应方法、执行路由后发送返回值给调用者等。

每个项目对 URL 路由的需求都不一样,基于 ZIKRouter 强大的可扩展性,你也可以按照项目需求实现自己的 URL 路由规则。

用 router 对象代替 router 子类

除了创建 router 子类,也可以使用通用的 router 实例对象,在每个对象的 block 属性中提供和 router 子类一样的功能,因此不必担心类过多的问题。原理就和用泛型 configuration 代替 configuration 子类一样。

ZIKViewRoute 对象通过 block 属性实现子类重写的效果,代码可以用链式调用:

1
2
3
4
5
6
7
8
9
10
ZIKViewRoute<EditorViewController, ViewRouteConfig>
.make(withDestination: EditorViewController.self, makeDestination: ({ (config, router) -> EditorViewController? in
return EditorViewController()
}))
.prepareDestination({ (destination, config, router) in
}).didFinishPrepareDestination({ (destination, config, router) in
})
.register(RoutableView<EditorViewProtocol>())
Objective-C Sample

1
2
3
4
5
6
7
8
9
10
11
12
[ZIKDestinationViewRoute(id<EditorViewProtocol>)
makeRouteWithDestination:[ZIKInfoViewController class]
makeDestination:^id<EditorViewProtocol> _Nullable(ZIKViewRouteConfig *config, ZIKRouter *router) {
return [[EditorViewController alloc] init];
}]
.prepareDestination(^(id<EditorViewProtocol> destination, ZIKViewRouteConfig *config, ZIKViewRouter *router) {
})
.didFinishPrepareDestination(^(id<EditorViewProtocol> destination, ZIKViewRouteConfig *config, ZIKViewRouter *router) {
})
.registerDestinationProtocol(ZIKRoutable(EditorViewProtocol));


简化 router 实现

基于 ZIKViewRoute 对象实现的 router,可以进一步简化 router 的实现代码。

如果你的类很简单,并不需要用到 router 子类,直接一行代码注册类即可:

1
ZIKAnyViewRouter.register(RoutableView<EditorViewProtocol>(), forMakingView: EditorViewController.self)
Objective-C Sample

1
[ZIKViewRouter registerViewProtocol:ZIKRoutable(EditorViewProtocol) forMakingView:[EditorViewController class]];


或者用 block 自定义创建对象的方式:

1
2
3
4
ZIKAnyViewRouter.register(RoutableView<EditorViewProtocol>(),
forMakingView: EditorViewController.self) { (config, router) -> EditorViewProtocol? in
return EditorViewController()
}
Objective-C Sample

1
2
3
4
5
6
[ZIKViewRouter
registerViewProtocol:ZIKRoutable(EditorViewProtocol)
forMakingView:[EditorViewController class]
making:^id _Nullable(ZIKViewRouteConfiguration *config, ZIKViewRouter *router) {
return [[EditorViewController alloc] init];
}];


或者指定用 C 函数创建对象:

1
2
3
4
5
6
function makeEditorViewController(config: ViewRouteConfig) -> EditorViewController? {
return EditorViewController()
}
ZIKAnyViewRouter.register(RoutableView<EditorViewProtocol>(),
forMakingView: EditorViewController.self, making: makeEditorViewController)
Objective-C Sample

1
2
3
4
5
6
7
8
id<EditorViewController> makeEditorViewController(ZIKViewRouteConfiguration *config) {
return [[EditorViewController alloc] init];
}
[ZIKViewRouter
registerViewProtocol:ZIKRoutable(EditorViewProtocol)
forMakingView:[EditorViewController class]
factory:makeEditorViewController];


事件处理

有时候模块需要处理一些系统事件或者 app 的自定义事件,此时可以让 router 子类实现,再进行遍历分发。

1
2
3
4
5
class SomeServiceRouter: ZIKServiceRouter {
@objc class func applicationDidEnterBackground(_ application: UIApplication) {
// handle applicationDidEnterBackground event
}
}
1
2
3
4
5
6
7
8
9
10
11
12
13
14
15
16
17
class AppDelegate: NSObject, NSApplicationDelegate {
func applicationDidEnterBackground(_ application: UIApplication) {
Router.enumerateAllViewRouters { (routerType) in
if routerType.responds(to: #selector(applicationDidEnterBackground(_:))) {
routerType.perform(#selector(applicationDidEnterBackground(_:)), with: application)
}
}
Router.enumerateAllServiceRouters { (routerType) in
if routerType.responds(to: #selector(applicationDidEnterBackground(_:))) {
routerType.perform(#selector(applicationDidEnterBackground(_:)), with: application)
}
}
}
}
Objective-C Sample

1
2
3
4
5
6
7
8
9
@interface SomeServiceRouter : ZIKServiceRouter
@end
@implementation SomeServiceRouter
+ (void)applicationDidEnterBackground:(UIApplication *)application {
// handle applicationDidEnterBackground event
}
@end


1
2
3
4
5
6
7
8
9
10
11
12
13
14
15
16
17
18
19
@interface AppDelegate ()
@end
@implementation AppDelegate
- (void)applicationDidEnterBackground:(UIApplication *)application {
[ZIKAnyViewRouter enumerateAllViewRouters:^(Class routerClass) {
if ([routerClass respondsToSelector:@selector(applicationDidEnterBackground:)]) {
[routerClass applicationDidEnterBackground:application];
}
}];
[ZIKAnyServiceRouter enumerateAllServiceRouters:^(Class routerClass) {
if ([routerClass respondsToSelector:@selector(applicationDidEnterBackground:)]) {
[routerClass applicationDidEnterBackground:application];
}
}];
}
@end


单元测试

借助于使用接口管理依赖的方案,我们在对模块进行单元测试时,可以自由配置 mock 依赖,而且无需 hook 模块内部的代码。

例如这样一个依赖于网络模块的登陆模块:

1
2
3
4
5
6
7
8
9
10
11
12
13
14
15
16
// 登录模块
class LoginService {
func login(account: String, password: String, completion: (Result<LoginError>) -> Void) {
// 内部使用 RequiredNetServiceInput 进行网络访问
let netService = Router.makeDestination(to: RoutableService<RequiredNetServiceInput
>())
let request = makeLoginRequest(account: account, password: password)
netService?.POST(request: request, completion: completion)
}
}
// 声明依赖
extension RoutableService where Protocol == RequiredNetServiceInput {
init() {}
}
Objective-C Sample

1
2
3
4
5
6
7
8
9
10
11
12
13
14
15
16
17
18
// 登录模块
@interface LoginService : NSObject
@end
@implementation LoginService
- (void)loginWithAccount:(NSString *)account password:(NSString *)password completion:(void(^)(Result *result))completion {
// 内部使用 RequiredNetServiceInput 进行网络访问
id<RequiredNetServiceInput> netService = [ZIKRouterToService(RequiredNetServiceInput) makeDestination];
Request *request = makeLoginRequest(account, password);
[netService POSTRequest:request completion: completion];
}
@end
// 声明依赖
@protocol RequiredNetServiceInput <ZIKServiceRoutable>
- (void)POSTRequest:(Request *)request completion:(void(^)(Result *result))completion;
@end


在编写单元测试时,不需要引入真实的网络模块,可以提供一个自定义的 mock 网络模块:

1
2
3
4
5
class MockNetService: RequiredNetServiceInput {
func POST(request: Request, completion: (Result<NetError>) {
completion(.success)
}
}
1
2
3
4
5
// 注册 mock 依赖
ZIKAnyServiceRouter.register(RoutableService<RequiredNetServiceInput>(),
forMakingService: MockNetService.self) { (config, router) -> EditorViewProtocol? in
return MockNetService()
}
Objective-C Sample

1
2
3
4
5
6
7
8
9
@interface MockNetService : NSObject <RequiredNetServiceInput>
@end
@implementation MockNetService
- (void)POSTRequest:(Request *)request completion:(void(^)(Result *result))completion {
completion([Result success]);
}
@end


1
2
// 注册 mock 依赖
[ZIKServiceRouter registerServiceProtocol:ZIKRoutable(EditorViewInput) forMakingService:[MockNetService class]];


对于那些没有接口交互的外部依赖,例如只是简单的跳转到对应界面,则只需注册一个空白的 proxy。

单元测试代码:

1
2
3
4
5
6
7
8
9
10
11
12
13
14
class LoginServiceTests: XCTestCase {
func testLoginSuccess() {
let expectation = expectation(description: "end login")
let loginService = LoginService()
loginService.login(account: "account", password: "pwd") { result in
expectation.fulfill()
}
waitForExpectations(timeout: 5, handler: { if let error = $0 {print(error)}})
}
}
Objective-C Sample

1
2
3
4
5
6
7
8
9
10
11
12
13
14
15
16
@interface LoginServiceTests : XCTestCase
@end
@implementation LoginServiceTests
- (void)testLoginSuccess {
XCTestExpectation *expectation = [self expectationWithDescription:@"end login"];
[[LoginService new] loginWithAccount:@"" password:@"" completion:^(Result *result) {
[expectation fulfill];
}];
[self waitForExpectationsWithTimeout:5 handler:^(NSError * _Nullable error) {
!error? : NSLog(@"%@", error);
}];
}
@end


使用接口管理依赖,可以更容易 mock,剥除外部依赖对测试的影响,让单元测试更稳定。

接口版本管理

使用接口管理模块时,还有一个问题需要注意。接口是会随着模块更新而变化的,这个接口已经被很多外部使用了,要如何减少接口变化产生的影响?

此时需要区分新接口和旧接口,区分版本,推出新接口的同时,保留旧接口,并将旧接口标记为废弃。这样使用者就可以暂时使用旧接口,渐进式地修改代码。

这部分可以参考 Swift 和 OC 中的版本管理宏。

接口废弃,可以暂时使用,建议尽快使用新接口代替:

1
2
// Swift
@available(iOS, deprecated: 8.0, message: "Use new interface instead")
1
2
// Objective-C
API_DEPRECATED_WITH_REPLACEMENT("performPath:configuring:", ios(7.0, 7.0));

接口已经无效:

1
2
// Swift
@available(iOS, unavailable)
1
2
// Objective-C
NS_UNAVAILABLE

最终形态

最后,一个 router 的最终形态就是下面这样:

1
2
3
4
5
6
7
8
9
10
11
12
13
14
15
16
17
18
19
20
21
22
23
24
25
26
27
28
29
30
31
32
33
34
35
36
37
38
// editor 模块的 router
class EditorViewRouter: ZIKViewRouter<EditorViewController, ViewRouteConfig> {
override class func registerRoutableDestination() {
registerView(EditorViewController.self)
register(RoutableView<EditorViewProtocol>())
registerURLPattern("app://editor/:title")
}
override func processUserInfo(_ userInfo: [AnyHashable : Any] = [:], from url: URL) {
let title = userInfo["title"]
// 处理 url 中的参数
}
// 子类重写,创建模块
override func destination(with configuration: ViewRouteConfig) -> Any? {
let destination = EditorViewController()
return destination
}
// 配置模块,注入静态依赖
override func prepareDestination(_ destination: EditorViewController, configuration: ViewRouteConfig) {
// 注入 service 依赖
destination.storageService = Router.makeDestination(to: RoutableService<EditorStorageServiceInput>())
// 其他配置
// 处理来自 url 的参数
if let title = configuration.userInfo["title"] as? String {
destination.title = title
} else {
destination.title = "默认标题"
}
}
// 事件处理
@objc class func applicationDidEnterBackground(_ application: UIApplication) {
// handle applicationDidEnterBackground event
}
}
Objective-C Sample

1
2
3
4
5
6
7
8
9
10
11
12
13
14
15
16
17
18
19
20
21
22
23
24
25
26
27
28
29
30
31
32
33
34
35
36
37
38
39
40
41
42
43
// editor 模块的 router
@interface EditorViewRouter : ZIKViewRouter
@end
@implementation EditorViewRouter
+ (void)registerRoutableDestination {
[self registerView:[EditorViewController class]];
[self registerViewProtocol:ZIKRoutable(EditorViewProtocol)];
[self registerURLPattern:@"app://editor/:title"];
}
- (void)processUserInfo:(NSDictionary *)userInfo fromURL:(NSURL *)url {
NSString *title = userInfo[@"title"];
// 处理 url 中的参数
}
// 子类重写,创建模块
- (EditorViewController *)destinationWithConfiguration:(ZIKViewRouteConfiguration *)configuration {
EditorViewController *destination = [[EditorViewController alloc] init];
return destination;
}
// 配置模块,注入静态依赖
- (void)prepareDestination:(EditorViewController *)destination configuration:(ZIKViewRouteConfiguration *)configuration {
// 注入 service 依赖
destination.storageService = [ZIKRouterToService(EditorStorageServiceInput) makeDestination];
// 其他配置
// 处理来自 url 的参数
NSString *title = configuration.userInfo[@"title"];
if (title) {
destination.title = title;
} else {
destination.title = @"默认标题";
}
}
// 事件处理
+ (void)applicationDidEnterBackground:(UIApplication *)application {
// handle applicationDidEnterBackground event
}
@end


基于接口进行解耦的优势

我们可以看到基于接口管理模块的优势:

  • 依赖编译检查,实现严格的类型安全
  • 依赖编译检查,减少重构时的成本
  • 通过接口明确声明模块所需的依赖,允许外部进行依赖注入
  • 保持动态特性的同时,进行路由检查,避免使用不存在的路由模块
  • 利用接口,区分 required protocol 和 provided protocol,进行明确的模块适配,实现彻底解耦

回过头看之前的 8 个解耦指标,ZIKRouter 已经完全满足。而 router 提供的多种模块管理方式(makeDestination、prepareDestination、依赖注入、页面跳转、storyboard 支持),能够覆盖大多数现有的场景,从而实现渐进式的模块化,减轻重构现有代码的成本。